When designing iOS apps your default architecture will be MVC that comes from Cocoa framework.
In MVC the view controller is responsible for much more thing that it should. getting the data from all sources and rendering them to the UI at the same time. Sooner you will find out that things get complicated.
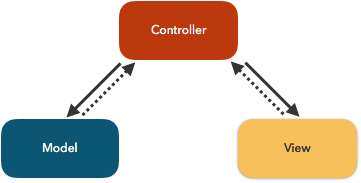
Model-View-ViewModel (MVVM) can be better design for your app for many reasons. The view owns the view model, unlike the MVC.
By moving logics to the view model and reducing the responsibility of the view controller we can achieve less complexity and better testable code.

More about MVVM you can find here .
Reactive programming
I’ll use ReactiveKit for this post.
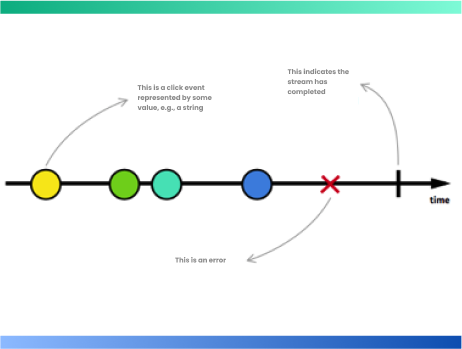
“Reactive programming is programming with asynchronous data streams.”
In the reactive world, everything is a stream, even a stream of streams is a stream.

A stream is a sequence of ongoing events ordered in time.
For example when the text of a text field changes as user types in. Each letter gives us a new state.
—[J]—[Ji]—[Jim]—|—>
We can think of these state changes as a sequence of events.
Those events defined as enum :
[sourcecode language=”java”] .next(Element) // An event that carries next element.
.failed(Error) // An event that represents failure. Carries an error.
.completed // An event that marks the completion of a sequence.[/sourcecode]
Sequences will usually have zero or more .next events followed by either a .completed or a .failed event.
In ReactiveKit Sequences are called signals.
What we can do with signals?
- The most important thing you can do on the sequence is observe the events it generates.
- Binding the signal to the target responsible.
- Wrap asynchronous calls into signals.
- Transform one or more signals into other signals.
- Handling signal errors and propagate all errors into a subject
- Tracking signal state
- Combining multiple signals
- Disposing signals & Disposing in a bag
Let’s jump into simple code example.
Lets say we have user registration form, and we would like to change the button “enabled” option as the form is filled with valid info.|We will use the function combineLatest to Combine multiple signals into one.
Then, we bind the result to the button isEnabled property.
In our ViewController :
[sourcecode language=”java”]
override func viewDidLoad() {
super.viewDidLoad()
let isValidData = combineLatest(emailTextfield.reactive.text, passwordTextfield.reactive.text){ email,password in
return self.viewModel.isValidEmail(email ?? “”) && self.viewModel.isValidPassword(password ?? “”)
}
isValidData.bind(to: signinButton.reactive.isEnabled)
}
[/sourcecode]
Much more about signals you can find here.
You can download the final project from this link.