Setting up an Account and quickly login into your app is crucial these days. Application developers strive to optimise this process and make it as easy as possible for users to start using their App while maintaining secure designated access.
Many Apps leverage 3rd party login systems, such as Google or Facebook Sign In , in addition to traditional email \ password sign-up process. The use of OAuth protocols and 3rd party frameworks is very appealing for both users and developers. it allows the users to authenticate with their favourite apps, using their known social media accounts, but at the same time, minimising risk for compromising their personal data, since the users don’t share their passwords with the App.
Developers can easily setup loginUI\UX and receive authorisation tokens validating the identity of a user.
Google, Facebook, Twitter, GitHub, Microsoft, Yahoo and others already have these SDK’s available for app developers to integrate in their projects, and now, so does Apple.
Sign In With Apple was announced in WWDC2019 as a simple native API which allows the addition of a ’Sign in with Apple’ button right in the App. Just a quick tap and the user is authenticated via a native UI leveraging FaceID/TouchID.
Sign In with Apple will be available for beta testing this summer. It will be required in apps that support third-party sign-in, when it is commercially available later this year.
So What are the Advantages of Sign In With Apple
- Native and simple API
- Users already used their AppleID to download the App, so there’s no need to remember (or forget) new password
- Every Account your App receives is 2-factor authentication protected
- Verified email address through which you can contact the user
- Anti-Fraud – Apple cross uses serval technologies for you to gain confidence that the user on your app is indeed real. This is boiled down to a single YES or NO question, and you receive a .realUser or an .unKnown status code which might imply a bot.
- Quick SignIn Flow – Allow users with existing account to re-authenticate in your app
- Cross platform – The API is available on each iOS platform (iOS, macOS, watchOS, tvOS) as well as web and Android application via JavaScript API.
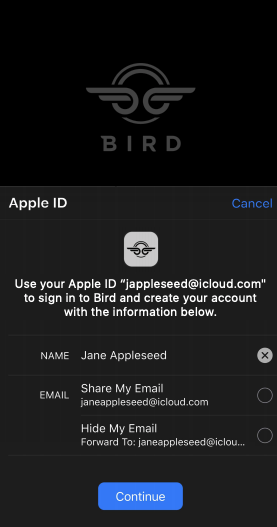
Private Email Relay Service
OAuth requires a negotiation session between the App and other service-providers (such as Google or Facebook). This tracking of where the user ‘came from’ and ‘where does he proceed’ is essential part of the ‘handshake’ process, however, is also used for internal advertising purposes. This means, signing in to various apps with known Auth providers, might result in the user’s email address becoming a spam dump. Apple has put much emphasis on user-privacy in designing this API. One of the key features of Sign In With Apple, is that users may choose to keep their AppleID Email private. In this case, Apple has setup an Email Relay Service, in which the App can seamlessly communicate with the user via a verified email address provided by Apple. This Service is a 2-way relay, meaning the user can also send massages back and also, decide, at a later date, if he or she no longer wishes to get email massages from the App. Apple insists it does not retain the forwarded massages, and that all massages are erased after successfully being sent to the designated destination.
Whether or not the user has decided to hide his \ her email from your App, is meaningless, since you still receive a verified email address by apple, and it is the same address, apple use to communicate with the users, so you can be sure, you’re not just getting some random ‘junk’ email address , created by the user, just for signing into your App. This also eliminates the need for cumbersome round-tripe emails bearing verification links the user is required to click on, in order to verify the email address with your app.
Sign-In Response
Upon initiating a Sign In With Apple authorisation request in your code, and setting up the appropriate delegates, the App receives Account Credential from Apple (once request is completed). This credential includes:
- User Identifier: This is a stable unique key for representing your user in your own DB. It remains the same across different platforms and is even associated with your team Apple Development Account.
- Identity Token and authCode: This is a short lived token which may be revoked. App must Listen for status changes of this token and handle it gracefully- such as redirect the user to the Login UI.
- Account information: Depending on the information the App asks for, during initation of the auth request, Apple may return the name and email address of the user.
- Real User Status: Is this a real-User or a potentially fake user, such a bot
How to integrate into Your App
Perquisites
Add the Sign In With Apple Capability to your project settings in Xcode, when you do this, Xcode will add the appropriate entry into your app entitlement file. In Addition, you must add this capability in your Apple developer portal account under the appropriate AppID
Configuring The use of Private Email Relay Service
If you plane to ask your users for their email address, you should take into considerations they may choose to hide their private email address and share with you the email address created by Apple. In order to use Apple email relay service you must register your outbound email domains
Add the Sign In With Apple Button
Using this simple swift code, you can create a method for displaying the native button
// Add “Sign In with Apple” button to your login viewController
func setUpProviderLoginView() {
let button = ASAuthorizationAppleIDButton()
button.addTarget(self, action: #selector(handleAuthorizationAppleIDButtonPress), for: .touchUpInside)
self.view.addArrangedSubview(button)
}
call this function in your override of ViewDidLoad
Configuring The Request and present the Auth UI ViewController
Staying consistent with the method name you’ve listed as the selector for the .touchUpInside Action, add the following function to your login viewController:
// Configure request, setup delegates and perform authorisation request
@objc func handleAuthorizationButtonPress() {
let request = ASAuthorizationAppleIDProvider().createRequest()
request.requestedScopes = [.fullName, .email]
let controller = ASAuthorizationController(authorizationRequests: [request])
controller.delegate = self
controller.presentationContextProvider = self
controller.performRequests()
}
Adopt the Appropriate protocols
Since your login viewController has been setup to be the delegate and presentationContextProvider, you must implement the appropriate methods, namely:
extension LoginViewController: ASAuthorizationControllerDelegate, ASAuthorizationControllerPresentationContextProviding {
fun authorizationController(controller: ASAuthorizationController, didCompleteWithAuthorization authorization: ASAuthorization) {
if let credential = authorization.credential as? ASAuthorizationAppleIDCredential {
let userIdentifier = credential.user
let identityToken = credential.identityToken
let authCode = credential.authorizationCode
let realUserStatus = credential.realUserStatus
// Create account in your system
// Store the userIdentifier in the keychain
saveUserIdentifier(userIdentifier: userIdentifier)
// Dismiss the login viewController and present the User’s associated content part of your App
}
}
fun authorizationController(controller: ASAuthorizationController, didCompleteWithError error: Error) {
// Handle error
}
fun presentationAnchor(for controller: ASAuthorizationController) {
return self.view.window!
}
}
Notice that we can save the userIdentifer to the KeyChain. Although not required, this is a recommended approach since, the Keychain offers a secure and encrypted alternative for storing user data (as oppose
To UserDefults, plist or similar methods). In our case ’saveUserIdentifier’ is just a wrapper method for invoking the Apple KeyChain Service API.
Add Quick Sign Flow
So far we’ve setup how to create a new user account, we also want to allow the user to quickly sign back in to the App, in the case we already have a Sign In With Apple User Credentials associated with our App domain.
In order to achieve this, we add another function to our Login viewController:
///Prompts the user if an existing iCloud Keychain credential or Apple ID credential exists.
func performExistingAccountSetupFlows() {
// Prepare requests for both Apple ID and password providers.
let requests = [ASAuthorizationAppleIDProvider().createRequest(), ASAuthorizationPasswordProvider().createRequest()]
// Create an authorization controller with the given requests.
let authorizationController = ASAuthorizationController(authorizationRequests: requests)
authorizationController.delegate = self
authorizationController.presentationContextProvider = self
authorizationController.performRequests()
}
Notice we’ve add 1 more type of a request – Password request from the keyChain, so we have to also handle its potential response on our delegate function. Let’s add this case:
fun authorizationController(controller: ASAuthorizationController, didCompleteWithAuthorization authorization: ASAuthorization) {
if let credential = authorization.credential as? ASAuthorizationAppleIDCredential {
let userIdentifier = credential.user
let identityToken = credential.identityToken
let authCode = credential.authorizationCode
let realUserStatus = credential.realUserStatus
// Create account in your system
// Store the userIdentifier in the keychain
saveUserIdentifier(userIdentifier: userIdentifier)
// Dismiss the login viewController and Sign the user in using the Apple ID credential
}
if let passwordCredential as? ASPasswordCredential {
// Dismiss the login viewController and Sign the user in using their existing password credential
}
}
Finally, we have to call the ‘performExistingAccountSetupFlows’ function. One good place to call it, is in our override of viewDidAppear.

Checking The Credential Status of an AppleID user identifier upon Successful App launch
We want to insure that our user is properly authenticated. For that purpose, we can invoke the following code in our AppDelegate:
func application(_ application: UIApplication, didFinishLaunchingWithOptions launchOptions: [UIApplication.LaunchOptionsKey: Any]?) -> Bool{
If let userIdentifier = KeychainItem.currentUserIdentifier {
let provider = ASAuthorizationAppleIDProvider()
provider.getCredentialState(forUserID: “currentUserIdentifier”) { (credentialState, error) in
switch(credentialState){
case .authorized:
// Apple ID Credential is valid
break
case .revoked:
// Apple ID Credential revoked,. Call your existing sign out logic. Fall through to displaying sign in
fallthrough
case .notFound:
// Credential not found, show login UI default
shoeLoginViewController()
break
}
}
} else {
shoeLoginViewController()
}
}
Handling Session Changes
Finally, you should ‘listen’ through NSNotificationCenter for when the AppleID User credentials is revoked:
// Register for revocation notification
let center = NotificationCenter.default
let name = NSNotification.Name.ASAuthorizationAppleIDProviderCredentialRevoked
let observer = center.addObserver(forName: name, object: nil, queue: nil) { (Notification) in
// Sign the user out, optionally guide them to sign in again
}
One thought on “Introducing Sign In With Apple”
Leave a Reply
You must be logged in to post a comment.
Pingback: Apple Watch development - mobile development company's blog