Bow wow wow yeepee yo yeepe yeah ! who wants to learn how to create the bases of an instagram like app using SwiftUI ? One at the time guys, you”ll all get your piece of fun !
1 – Requirements
For this project we will need :
- A SwiftUI app initialized
- An image Api ( here we use going to use Pixabay Api)
- The pod ‘URLImage’
2 – Let’s get it started !

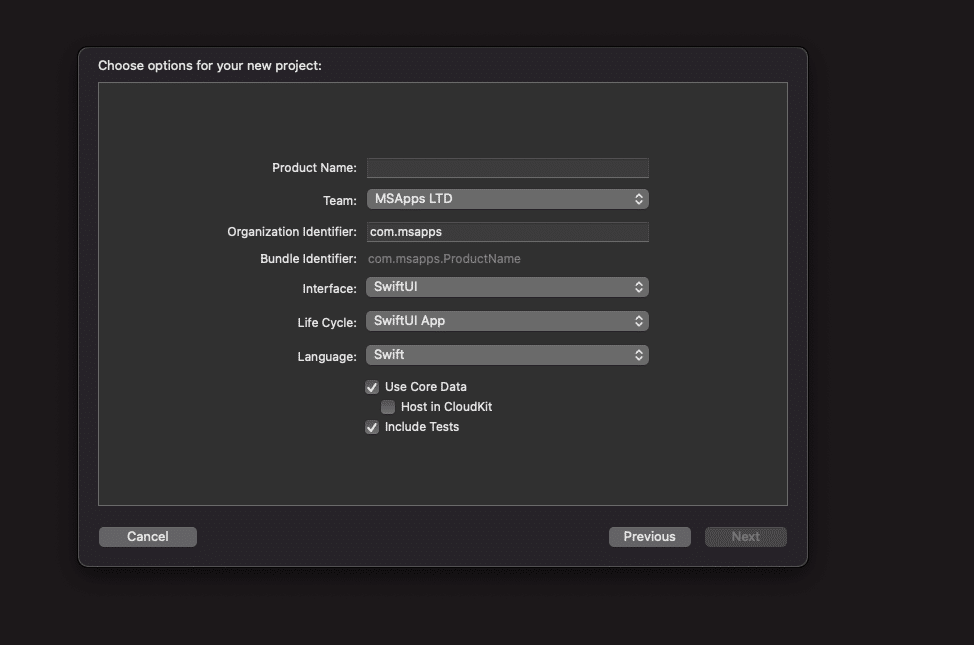
Pick the SwiftUI interface and the SwiftUI App lifecyle or you”ll be stuck with good old UIStoryboardKit and and the AppDelegate and as fun as they are they’re not relevant for today’s really important matter.
3 – Install your friendly pod (Thanks to @dmitro-anokhin)
Just so you know my dear apple eaters ( because you deserve it ), This pod is allowing us to load an image coming from a url without too much headaches.
Open your terminal where your project is located and do the same as the following screenshots.

Then open the newly created podfile and add pod ‘URLImage’ under # Pods for FakStagram. Close Xcode please. (It’s an order !)

Boom ! we can download and display images
4 – Organize your project
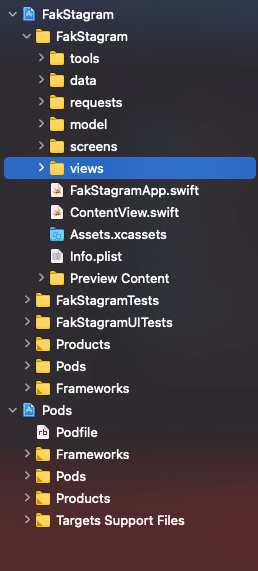
Because nothing is worst than a messy project ( and react-native’s errors), we need to take care of the it’s organization and create folders as I did :

5 – Let the coding begin !
First things first. In SwiftUi we play around with views, are you’re going to say “But a screen is not a view”. And you’ll be wrong (even with UiKit by the way mwahaha). A screen in SwiftUi is a view which contains others views or not.
Before we start playing with views though, we’ll fetch the needed data to populate them.
Register at Pixabay if it”s not done yet, and get your api key. The link we’ll use will look like :
https://pixabay.com/api/?key=[YOUR_KEY_HERE]&image_type=all&pretty=true&per_page=200
Then open the model folder and create a User.swift file. The data we need from the gotten json is contained in “hits” as an array containing our User data. And for a matter of clarity we’ll create on object “image” hold an object of image url strings. I hope it seems pretty clear here, we re going to create 3 structs Hit,User and ImageDl, where Hit holds an array of User and User holds an ImageDl object. The three of them needs to inherit the Codable typealias so we can decode the dowloaded data using them.
Let’s fetch and decode !
I don’t know for you but I feel like a boiling lobster my apple pies !
Open the requests folder and create a swift file Request.swift (If you want to be more creative go ahead). Because we’re old new school this tutorial doesn’t show the data fetching with Combine but URLSession. As Such and for the greater good you’ll have, dear round fruits, to create a protocol for communication matter. Let’s call it RequestProtocol and and go forward.
protocol RequestDelegate {
func downloaded(users : [User])
}
The downloaded function will be used as our data mule to the manager.
Below our friendly protocol we’ll write a struct called Request (as the file name). We’ll need it to hold a let urlString containing the whole string of the link to the data. and a var delegate : RequestDelegate so we can trigger the data muling !
Setup a ViewModel
Why do we need a view model in this project ? In two words , we don’t . BUT and its a big BUT. As responsible and organized as we are we know that each object has its own business and for that matter we do need it. We want the view model to act as processing machine, so we can fetch the data ready, clean and shiny from a manager, which one you asked ?
Creating access to the data
Oye oye , green and red fruits time has come to introduce you ( but not too much ) too the powerful DataManager ! It will be our Source Of Truth.
Open the data folder and create a DataManager.swift file. Within this new file we’ll create a DataManager class ( how original ) inheriting from the powerful and not famous enough yet COMBINE . For this project we’ll use it to get an @EnvironmentObject. It will be explained later, stay tuned …
…
zzZZzzz
…
I’m back ! Our data managers class needs to hold some empty values and methods triggering a coming viewModel that process the data to make it usable more easily. Look at the following snippet :
Creating our views
The moment you’ve all been waiting for has finally come, where creativity meets logic and where all our Picasso dreams come true ! Lets’ go !
As said earlier screens are views containing views, so we better create our inner views before we display and organize them into a screen.
Watch this :
What views have you detected ?
- Rounded icons
- Rounded Icons Gallery
- Search Bar
- Post
- Collections of images
You’ve understood the idea I guess. Let’s start with the simpler yet, a great example to understand SwifUi functionality. The StoryIcon look :

You should get this if the url is nil.
Now let’s embed this view into a scrolling gallery one to get an example of the reusable views concept in SwiftUi :
Here is the result :

Remember the @EnvironmentObject we talked about earlier ? Its’ basically an identifier of an object transmitted to a view through its parent, and holding shared data across the whole application. Since our DataManager is an ObservableObject we can “observe” (harvest his data ahaha) his current state and If you do some research, you’ll find out that you can actually update this object and its variables as well.
Time has come for you to figure out the rest by yourself, and I hope I gave you the will to study SwiftUi because you will need a bit of searching time to complete this project.
In the meanwhile I’ll leave a link to the final project.
Enjoy :