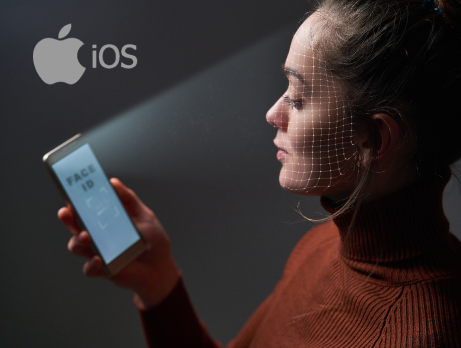
Apple presents a cool feature from iOS 11 called face recognition. This feature is a part of the Vision framework. It can detect faces, rectangle and more objects from an image.
In the following blog we will focus on detecting faces and handling the recognition results by adding rectangle and guiding lines above them.
A source code example:
https://github.com/msmobileapps/Face-Recognition-IOS
In the beginning, this feature couldn’t work without an image so we will have to ask a camera use permission in order to get it. Add to the info.plist “Privacy – Camera Usage Description” and write a proper descriptions to it.

For the next step, we will have to set up a standard capture session. Initialize AVCaptureVideoPreviewLayer and AVCaptureSession class instances.
Set the AVCaptureDevice default instance with AVCaptureDevice.DeviceType of builtInWideAngleCamera, AVMediaType to video and AVCaptureDevice.Position to front. Initialize the video output AVCaptureVideoDataOutput and add it to the session.
Notice to set the AVCaptureVideoDataOutputSampleBufferDelegate to the ViewController and set it the output’s delegate.
output.setSampleBufferDelegate(self, queue: .main)And also et the output video settings:
output.videoSettings = [kCVPixelBufferPixelFormatTypeKey as String: kCVPixelFormatType_32BGRA]Set a AVCaptureConnection (video connection) with video and with portrait orientation output.
let videoConnection = output.connection(with: .video)
videoConnection?.videoOrientation = .portrait
Start running the session on the preview layer (don’t forget to add the layer to the view layer)
After we set up the session, it’s time to handle the output. Add captureOutput(_:didOutput:from:) function to the ViewController. Initialize CMSampleBufferGetImageBuffer instance with the “sampleBuffer” we got from the output and check if it’s not nil.
guard let imageBuffer = CMSampleBufferGetImageBuffer(sampleBuffer) else {
   return
}
Initialize VNSequenceRequestHandler class instance, call his perform function and pass it the VNDetectFaceLandmarksRequest, the “imageBuffer” and set the CGImagePropertyOrientation property to leftMirrored.
do {
    try sequenceHandler.perform(
        [faceDetectionRequest],
        on: imageBuffer,
        orientation: .leftMirrored)
} catch {
    print(error.localizedDescription)
}
Set VNDetectFaceLandmarksRequest with a completion handler.
Check if there is no error so you can safely continue.
Make sure that the request that returned from the completion is a VNDetectFaceLandmarksRequest type and if so, check if it’s results are of VNFaceObservation array type.
guard let faceDetectionRequest = request as? VNDetectFaceLandmarksRequest,
    let results = faceDetectionRequest.results as? [VNFaceObservation] else {
    return
}
Now you have the face recognition result, use the first object from the “results” and do the wanted operations on it.
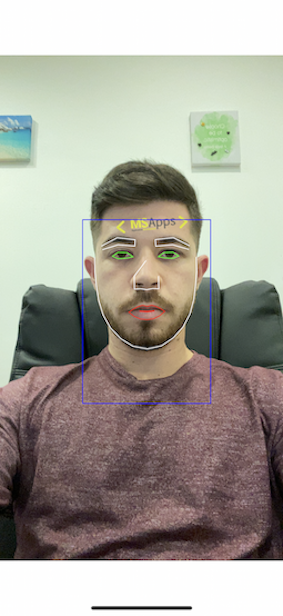
As an example I will draw a rectangle and some of the face guide line on the recognized face.
Add UIView to the ViewController and make sure it’s in the same size as the AVCaptureVideoPreviewLayer.
Create a new swift file and name it “FaceView” that extends UIView. This class propose is to draw on the view.
For the beginning, we will draw a rectangle around the face. Add “boundingBox” parameter and initialise it with CGRect.zero so it will never be nil. Then override the draw(_ rect: CGRect) function. Initialize the UIGraphicsGetCurrentContext class which is responsible for the drawings. Write the following code lines:
context.saveGState()
context.addRect(boundingBox)
UIColor.blue.setStroke()
context.restoreGState()
In these lines we draw the rectangle by the “boundingBox” parameter value in blue colour.
Now, back in the ViewController, associate this class to the created view and make the view an outlet in the ViewController (call it “faceView”).
In the end of the VNDetectFaceLandmarksRequest compilation block, start working on the main thread. Check if the “results” from the request aren’t empty and take the first one.
Then, for more convenience, create a function called “updateFaceView” and pass it the result. In this function, get the boundingBox from the result and convert this CGRect into points in the current layer do it could be drawn properly. Use the following function to do the conversion:
func convertToLayerPoint(rect: CGRect) -> CGRect {
    //start point
    let startPoint = videoPreview.layerPointConverted(fromCaptureDevicePoint: rect.origin)

    //end point
    let endPoint = videoPreview.layerPointConverted(fromCaptureDevicePoint: CGPoint(x: rect.size.width, y: rect.size.height))

    return CGRect(origin: startPoint, size: CGSize(width: endPoint.x, height: endPoint.y))
}
Set the returned CGRect to the boundingBox parameter of the “faceView”. And refresh the view by calling setNeedsDisplay function. When the view is refreshed his draw function is triggered and the box is drawn.
Run the app and check out the result.
In order to draw move detailed lines around some of the face’s guide lines, follow the next steps.
In the FaceView class add “rightEye” parameter of type CGPoint array and initialize it with an empty array (so it won’t be nil).
Back in the “updateFaceView” function, before the setNeedsDisplay call, check if the result has landmarks, if true we will have to create drawable points array of landmarks of the right eye.
To do so properly add this two functions:
func pointsToDrawFrom(points: [CGPoint]?, to boundingBoxRect: CGRect) -> [CGPoint]? {
    guard let points = points else {
        return nil
    }

    return points.compactMap { makeDrawableLandmarkOnLayer(point: $0, rect: boundingBoxRect) }
}

func makeDrawableLandmarkOnLayer(point: CGPoint, rect: CGRect) -> CGPoint{
    //make points from landmark points to something that can be drawn on the current layer

    let drowablePoint = CGPoint(x: point.x * rect.size.width + rect.origin.x, y: point.y * rect.size.height + rect.origin.y)

    return videoPreview.layerPointConverted(fromCaptureDevicePoint: drowablePoint)
}
Pass the pointsToDrawFrom function the normalizedPoints of the rightEye parameter of the landmarks and with the returned CGPoint array set the “rightEye” parameter of the “FaceView”.
Go to the “FaceView” class in the draw functions and start drawing the right eye:
if !rightEye.isEmpty {
    context.strokePath()
    context.addLines(between: rightEye)
    context.closePath()
}
If you run the app you will notice that there are lines around the right eye. In case you would like to add more line repeat this process and add lines for: leftEye, rightEyebrow, leftEyebrow, nose, faceContour, outerLips and innerLips.
Read also about augmented reality iOS
4 thoughts on “Face Recognition iOS”
Leave a Reply
You must be logged in to post a comment.
Pingback: First experience with augmented reality - MSAPPS
Pingback: Conversational Shortcuts-Params in iOS13 - mobile development blog
Pingback: Augmented Reality iOS - mobile development company's blog
Pingback: Machine Learning – MSAPPS