
The Core Graphics framework is based on the power of Quartz advanced drawing engine. It provides low-level, lightweight 2D rendering. The uses of this framework are to handle path-based drawing, transformations, colour management, offscreen rendering, patterns, gradients and shadings, image data management, image creation, and image masking. In addition, it can also used as PDF document creation, parsing, and display.
In the following tutorial we will focus on several features.
UIGraphicsRenderer
UIGraphicsRenderer an abstract base class for creating graphics renderers. You cannot use use this class directly, so use his subclasses or make your own subclasses. The Core Graphics framework provides 2 subclasses: UIGraphicsImageRenderer and UIGraphicsPDFRenderer.
Those graphic rendering classes provide memory-efficient management of Core Graphics framework contexts.
UIGraphicsImageRenderer
A graphics renderer for creating images with Core Graphics framework.
The UIGraphicsImageRenderer class helps you to accomplish drawing tasks.
Instantiate a UIGraphicsImageRenderer object, you may choose between providing the dimensions of the output or passing an empty value so the rendering bounds will be the current device screen size.
Next, choose the desired output from the following options: UIImage, Data of jpg or Data of png. For our example we will use the image(actions:) function in order to get an UIImage.
Inside this function we will add instruction that describes what to draw. Inside the block the function provides UIGraphicsImageRendererContext, with the object’s CGContext parameter we will manage the drawings.
let renderer = UIGraphicsImageRenderer(size: CGSize(width: 500, height: 500))
let image = renderer.image { (context) in
}
Now Let’s learn to do draw. First we begin with drawing a single line with some simple steps:
- Set the initial point with the move(to:) function.
- Then call addLine(to:) and pass in the end point.
- Last, use the drawPath(using:) function and pass it the wanted CGPathDrawingMode. This function draws the lines that were previously defined in the current block. In this case, we will use the stroke mode.
In addition, you can customize this line with the help of this functions:
- Set the line’s width with the setLineWidth().
- Set the line’s color with the setStrokeColor().
let renderer = UIGraphicsImageRenderer(size: CGSize(width: 500, height: 500))
let image = renderer.image { (context) in
    context.cgContext.setLineWidth(5)
    context.cgContext.move(to: CGPoint(x: 100, y: 100))
    context.cgContext.addLine(to: CGPoint(x: 200, y: 200))
    context.cgContext.setStrokeColor(UIColor.green.cgColor)
    context.cgContext.drawPath(using: .stroke)
}
Next steps in Core Graphics framework
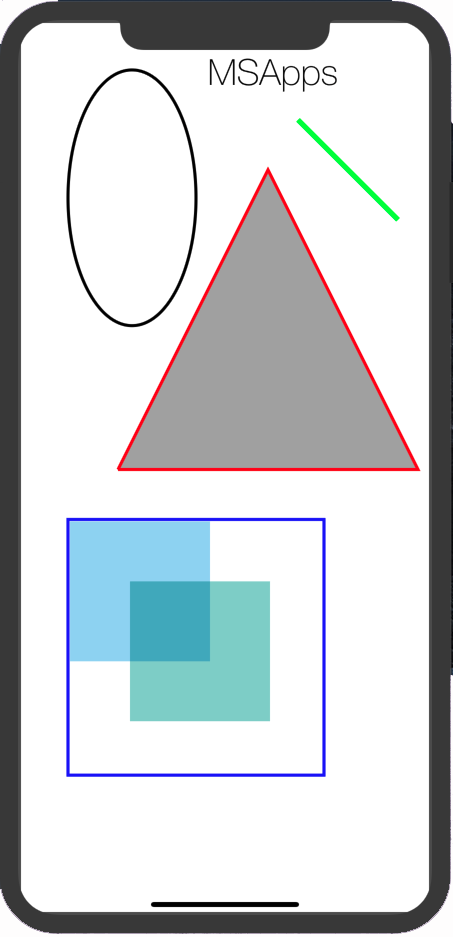
After learning how to draw a line, we can draw any shape.
For example, add the following code into the image(actions:) function block to draw a triangle:
let renderer = UIGraphicsImageRenderer(size: CGSize(width: 500, height: 500))
let image = renderer.image { (context) in
    context.cgContext.move(to: CGPoint(x: 50, y: 350))
    context.cgContext.addLine(to: CGPoint(x: 200, y: 50))
    context.cgContext.addLine(to: CGPoint(x: 350, y: 350))
    context.cgContext.addLine(to: CGPoint(x: 50, y: 350))
}
n case you like to fill the inside of the shape set the CGPathDrawingMode to fillStroke and set the fill color with the setFillColor() function.
context.cgContext.setFillColor(UIColor.red.cgColor)
context.cgContext.drawPath(using: .fillStroke)
Next, we will learn how simple draw a rectangle. Use the addRect() function, pass it the wanted rect and finally call the drawPath(using:).
let renderer = UIGraphicsImageRenderer(size: CGSize(width: 500, height: 500))
let image = renderer.image { (context) in
    let rect = CGRect(x: 50, y: 50, width: 256, height: 256)
    context.cgContext.addRect(rect)
    context.cgContext.drawPath(using: .stroke)
}
Another option to draw a rectangle is to use the following function from the UIGraphicsImageRendererContext itself. Set the stroke to the UIGraphicsImageRenderer bounds. Then set the fill color. And finally fill the context with a rectangle:
context.stroke(renderer.format.bounds)
UIColor(red: 170/255, green: 225/255, blue: 235/255, alpha: 1).setFill()
context.fill(CGRect(x: 52, y: 52, width: 140, height: 140))
This drawing option provides you the ability to set the blend mode to multiply in order to blend the colors when a shape covers another. Add the following code to see an example:
UIColor(red: 145/255, green: 211/255, blue: 205/255, alpha: 1).setFill()
context.fill(CGRect(x: 112, y: 112, width: 140, height: 140), blendMode: .multiply)
For last, we will draw a circle and ellipse. As the previous shapes, apple provided us an easy way to draw it. In the image(actions:) function block pass a rect to the addEllipse(in:) method and call the drawPath(using:) function. If the rect’s sides are equal, a circle will be drawn, else there will be an ellipse.
let renderer = UIGraphicsImageRenderer(size: CGSize(width: 500, height: 500))
let image = renderer.image { (context) in
    let ellipse = CGRect(x: 0, y: 0, width: 256, height: 512)
    context.cgContext.addEllipse(in: ellipse)
    let circle = CGRect(x: 0, y: 0, width: 512, height: 512)
    context.cgContext.addEllipse(in: circle)
    context.cgContext.drawPath(using: .stroke)
}
Another possible option is to draw text. Every Swift string has a built-in draw(with:) function and it can be used in some simple steps.
Ad before inside the image(actions:) function block, initialize NSMutableParagraphStyle instance and set it the desired properties. Then initialize dictionary with NSAttributedString of font and paragraphStyle. Create a string and call his draw(with:) function and pass it the required parameters.
let renderer = UIGraphicsImageRenderer(size: CGSize(width: 512, height: 512))
let img = renderer.image { ctx in
   let paragraphStyle = NSMutableParagraphStyle()
   paragraphStyle.alignment = .center

   let attrs = [NSAttributedString.Key.font: UIFont(name: "HelveticaNeue-Thin", size: 36)!, NSAttributedString.Key.paragraphStyle: paragraphStyle]

   let string = "MSApps"
   string.draw(with: CGRect(x: 30, y: 30, width: 450, height: 450), options: .usesLineFragmentOrigin, attributes: attrs, context: nil)
}
User Drawing Option
Many apps uses the Core Graphics framework as a base for their drawing tool. In order to do that we have to detect users touches events: began, moved and ended. Each event gives us a point we can use to combine into a line. In this way we can perform the drawing action.
Let’s start by creating a class of a stroke, it will contain the properties: startPoint, endPoint, width and color. You can add more properties for more complex options.
struct Stroke {
    let startPoint: CGPoint
    let endPoint: CGPoint
    let color: CGColor
    var lineWidth: CGFloat?
}
Next, we will create a class that inherits UIView, because we need to override the touches events functions. Also, it will be much more organized. Now let’s create the variables:
var lastPoint:CGPoint!
var currentColor:CGColor = UIColor.black.cgColor
var strokes = [Stroke]()
var lastStrokes = [Stroke]()
var lineWidth:CGFloat = 10.0
var isDrawing = false- The lastPoint variable detects the last touched point.
- The strokes array is where all the drawn lines are stored.
- The last variable is a very important one, it shows whenever the drawing action is active. This prevents any situations like when the touchMoved function is called before the touchStarted and causes the lastPoint value to be nil.
Now, for the main part, in each touch response function we will handle the “touch” and cast in to a CGPoint. Then we will create strokes and add it to the strokes array.
Notice that in order to actually show the user what he drew we have to refresh the view by calling setNeedsDisplay().
Code example
override func touchesBegan(_ touches: Set<UITouch>, with event: UIEvent?) {
        guard !isDrawing else { return }
        isDrawing = true
        guard let touch = touches.first else { return }
        let currentPoint = touch.location(in: self)
        lastPoint = currentPoint
    }

override func touchesMoved(_ touches: Set<UITouch>, with event: UIEvent?) {
    guard isDrawing else { return }
    guard let touch = touches.first else { return }
    let currentPoint = touch.location(in: self)
    if lastPoint == nil{
        return
    }
    var stroke = Stroke(startPoint: lastPoint, endPoint: currentPoint, color: currentColor)
    stroke.lineWidth = lineWidth
    strokes.append(stroke)
    lastPoint = currentPoint
    setNeedsDisplay()
}

override func touchesEnded(_ touches: Set<UITouch>, with event: UIEvent?) {
    guard isDrawing else { return }
    isDrawing = false
    guard let touch = touches.first else { return }
    let currentPoint = touch.location(in: self)
    if lastPoint == nil{
        return
    }
    let stroke = Stroke(startPoint: lastPoint, endPoint: currentPoint, color: currentColor)
    strokes.append(stroke)
    lastPoint = nil
    setNeedsDisplay()
}
All this code would never work unless we actually handle the added strokes. This will be done in the draw() function, which is also a UIView’s function.
We init the UIGraphicsGetCurrentContext and begin iterating over the strokes array and drawing each one as we did in when we drew a simple line.
override func draw(_ rect: CGRect) {
    let context = UIGraphicsGetCurrentContext()
    context?.setLineCap(.round)
    for stroke in strokes {
        if let lineWidth = stroke.lineWidth {
            context?.setLineWidth(lineWidth)
        }
        context?.beginPath()
        context?.move(to: stroke.startPoint)
        context?.addLine(to: stroke.endPoint)
        context?.setStrokeColor(stroke.color)
        context?.strokePath()
    }
}
For the final step, create a View from storyboard or from code in your ViewController and set it to be our custom view type.
Bonus option:
After finishing the drawing you may want to export it into an image. That can be easily done by using similar function as in the previous sections.
func exportImage() -> UIImage{
    let renderer = UIGraphicsImageRenderer(bounds: self.bounds)
    let image = renderer.image { (context) in
        context.cgContext.setLineCap(.round)
        strokes = []
        setNeedsLayout()
        self.drawHierarchy(in: self.bounds, afterScreenUpdates: true)
    }
    UIImageWriteToSavedPhotosAlbum(image, self, #selector(self.image(_:didFinishSavingWithError:contextInfo:)), nil)
    return image
}

@objc func image(_ image: UIImage, didFinishSavingWithError error: Error?, contextInfo: UnsafeRawPointer) {
    if let error = error {
        print("IMAGE NOT SAVED ",error)
    } else {
        print("IMAGE SAVED")
    }
}
Reducing High CPU usage
When drawing lots of lines and shapes with Core Graphics framework you may cause high usage of the CPU. If you run the CPU Report in Xcode, after drawing many line, you will notice the CPU increases up to 100%. This is unwanted situation because it slows does the app, causes lags and high battery usage.

But don’t worry, there is a way to decrease it. The solutions is to export all the subviews and drawn lines or objects into an image. Then simply set the exported image to an ImageView we will create.
This is done in the following way:
Add an ImageView and init it in the awakeFromNib() method.
backImageView = UIImageView(frame: self.frame)
self.addSubview(backImageView)
Then create a function that will export the current drawing. Init the UIGraphicsBeginImageContext object with the current frame. Init the current context and then call the UIGraphicsGetImageFromCurrentImageContext in order to turn the presented context on the screen to an image. After that set the saved image into the created ImageView and call the UIGraphicsEndImageContext to end the current image drawing.
fileprivate func exportCurrentDrawing() {
    UIGraphicsBeginImageContext(self.frame.size)
    if let context = UIGraphicsGetCurrentContext() {
        self.layer.render(in: context)
    }
    if let savedImg = UIGraphicsGetImageFromCurrentImageContext(){
        DispatchQueue.main.async {
           self.backImageView.image = savedImg
           self.bringSubviewToFront(self.backImageView)
        }
    }
    UIGraphicsEndImageContext()
}
Finally, in the end of the draw() function, add an if condition that calls the created function every 100 (or any other optimised number) to our created method. Then remove all the values from the strokes array so they won’t be drawn again.
if strokes.count % 100 == 0 {
    DispatchQueue.main.async {
        self.exportCurrentDrawing()
        self.strokes.removeAll()
    }
}
The result is significantly better, the CPU usage reduced from 100% to maximum 20%-25%!

UIGraphicsPDFRenderer
Additional subclass of UIGraphicsRenderer is UIGraphicsPDFRenderer, this class feature is to create pdf files from code via the Core Graphics framework. As same as UIGraphicsImageRenderer, this subclass is also very easy to use.
So let’s begin, create a CGRect with the wanted page size (for the example we will create an A4 page). Then, create a title and the text for the document. See the following code lines as an example:
let title = "MSApps\n"
let text = "MSApps is a company for application developing."

let titleAttributes = [NSAttributedString.Key.font: UIFont.boldSystemFont(ofSize: 36)]
let textAttributes = [NSAttributedString.Key.font: UIFont.systemFont(ofSize: 12)]

let formattedTitle = NSMutableAttributedString(string: title, attributes: titleAttributes)
let formattedText = NSAttributedString(string: text, attributes: textAttributes)
        formattedTitle.append(formattedText)
Create an UIGraphicsRenderer instance. Now, you have 2 use options. The first is to create a PDF Data object and the second one is to save the PDF to an URL. Let’s observe both of them.
For the first option, use the UIGraphicsRenderer’s pdfData(withActions:) function. Begin a new page and call the draw(in:) function from the created title and text.
let renderer = UIGraphicsPDFRenderer(bounds: a4PageRect)
let data = renderer.pdfData { context in
    context.beginPage()
    formattedTitle.draw(in: a4PageRect.insetBy(dx: 50, dy: 50))
}
For the second option, use the UIGraphicsRenderer’s writePDF(to:withActions:) function and pass it the documents folder URL with the desired PDF file name. The document writing itself is the same as in the first option.
var docURL = (FileManager.default.urls(for: .documentDirectory, in: .userDomainMask)).first
 docURL = docURL?.appendingPathComponent( "pdfFileExample.pdf")

  do {
        try renderer.writePDF(to: docURL!, withActions: { (context) in
        context.beginPage()
        formattedTitle.draw(in: a4PageRect.insetBy(dx: 50, dy: 50))
      })
        print("PDF saved successfully")
      } catch {
        print(error)
      }
Make sure you added the needed permission to the plist, otherwise the file won’t be saved.
In case you want to add another page simple use UIGraphicsRenderer’s beginPage() function and draw the Strings for the next page.