Apple at WWDC presented new extra functionality for Siri Shortcuts. Now we can have a conversation with Siri, ask her and “She” will answer us. But of course, we have to teach her before ?
Xcode automatically generates an intent handler protocol for every intent that you define and you implement this protocol in your intent handler. Now we see a new method in IntentHandler – resolve. This is exactly the main difference between “fresh” and “old” Siri.

In iOS 12 Xcode has generated two methods in the protocol: confirm and handle, in iOS 13 it also generates the resolve method for each parameter you’ve marked as user-configurable.
How does resolve method work
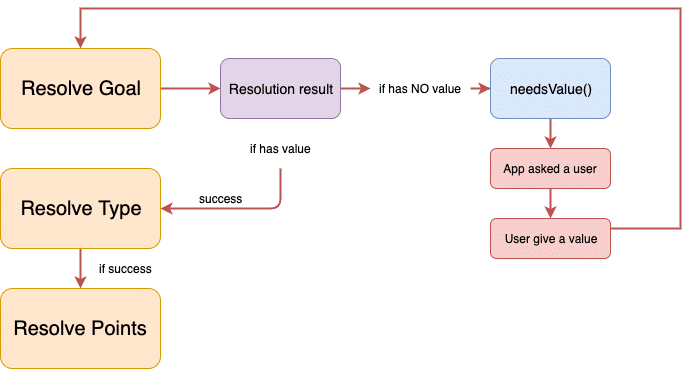
Let’s dive deeper in to what’s going on when we ask Siri… As mentioned before, Apple added a new method called resolve. The resolve method provides ResolutionResult which determines what Siri will do next. If there is no value it will pass Needs Value() and Siri will ask the user for the input value. The input that the user will say will be filed in the intent and the same Resolve method with the new input that we can handle in the Handle method.

Here we see the automatically generated method “resolveTeam”. Parameter “term” is an enum type and has three states: .unknown (no value or value don’t include one of the possible answers described at this enum), . shortTerm and .longTerm. If we didn’t get a valid value from a user it will result in equals raw value of our enum. TermResolutionResult calls “needsValue()” if yes we pass success. Now we can handle our intent in the handle method (check example below)

Shortcuts-Params in iOS 13 allow to the user has a conversation with the App (via Siri) and you control the conversation. You can prompt a user for the information you need and dynamically respond based on the answers he gave you.
Let’s take a look how it works when implemented in a “real” app. As an example we used a simple app called MyGoals. It’s a goals manager, that allows you to add a goal with terms and steps that you will have to do to reach your goal. Let’s do a step-by-step tutorial on how to make Siri work with our app via shortcuts-Params. Watch the App intro (starting point) …
Let’s add Siri to MyGoals app
You can download the sourse code of this app: https://msapps1@bitbucket.org/msapps1/mygoals.git
1. Engage Siri in our project.
To add Siri Capability, select our project in a project navigator and tap on Signing and Capability tab and press “+ Capability“
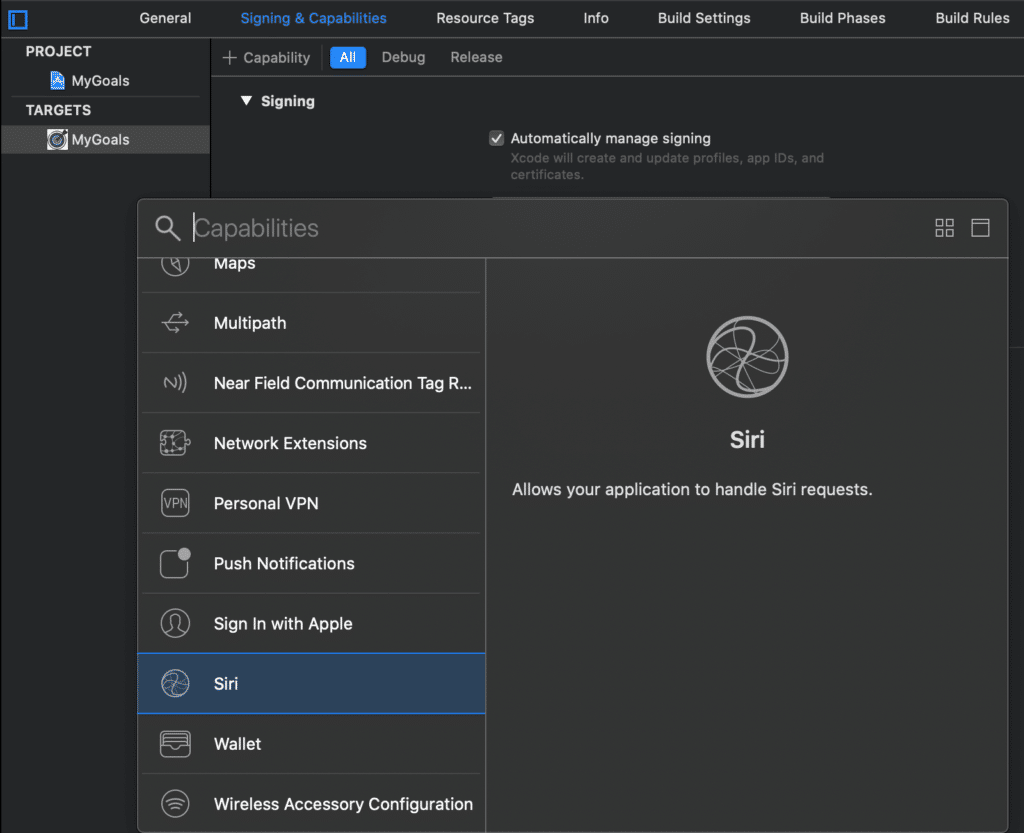
2. Add Siri Intents and Intents UI
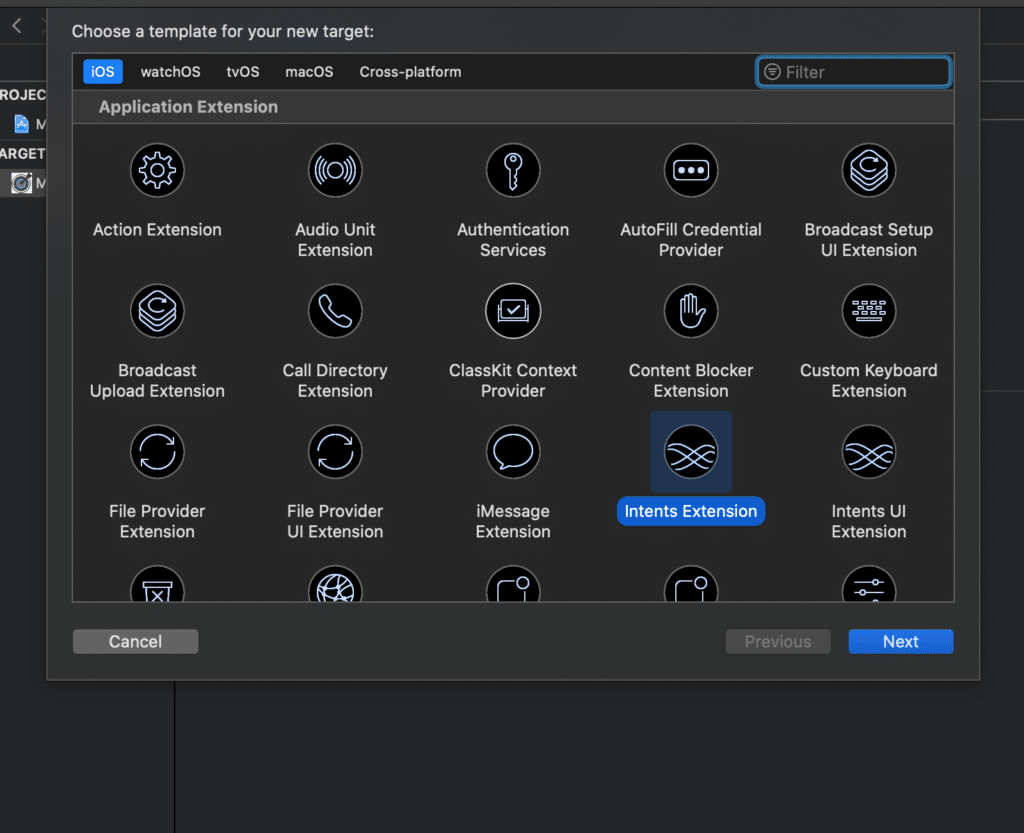
Siri Intents and Intents UI extensions help us to launch our intent outside the app. For adding them we need to add a new target by tapping “+” in the project navigator and choose “Intents Extension”. Xcode automatically will add “Intents UI Extension”. We can give a name to this intent (MyGoal), check that checkbox “Include UI Extensions” is checked.
After you will see two popup windows with the question “Do we want to Activate “MyGoal” Scheme?”. Check “Allow”.
3. Adding SiriKit Intent Definition File
This is the last preparation step before we can start to work with Siri in our app. Yes of course in the future we need to do some more steps to make Siri work correctly with our App.
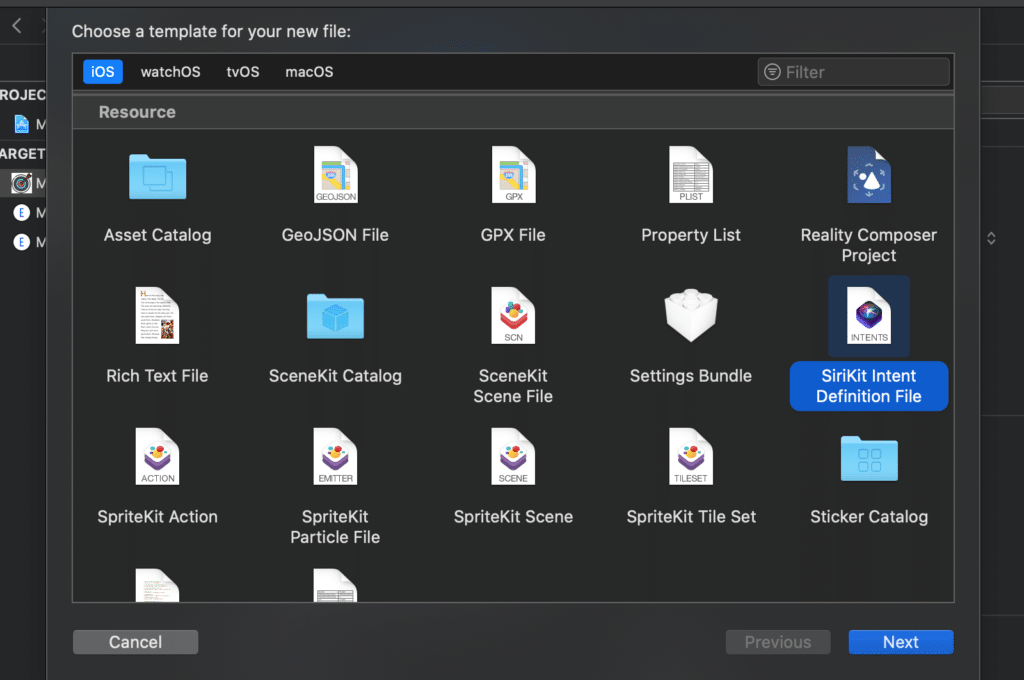
Select our project in a project navigator and press cmd+N and choose SiriKit Intent Definition File.
4. Adding new intent
It’s time to add a new intent. Click the “+” button, choose new intent and give a name to your intent, I named it NewGoal.intent.

With the implementation of Siri in our app we are facing a huge amount of settings and less code. But It’s very important to understand what does each line do. So…
- Category – here we choose a category for our intent. Just choose the most relevant category for your intent. It defines the default Siri dialog.
- Title – the name of your intent outside of the App, for example, Shortcuts App.
- Description – a short sentence that describes what the intent does.
- Default image – you can choose image from image assets.
- Confirmation – check User confirmation required if you need confirmation from the user before to handle the intent. For our example, we decided that we don’t need it…

5. Adding conversational iOS shotcuts-params for Siri to your intent
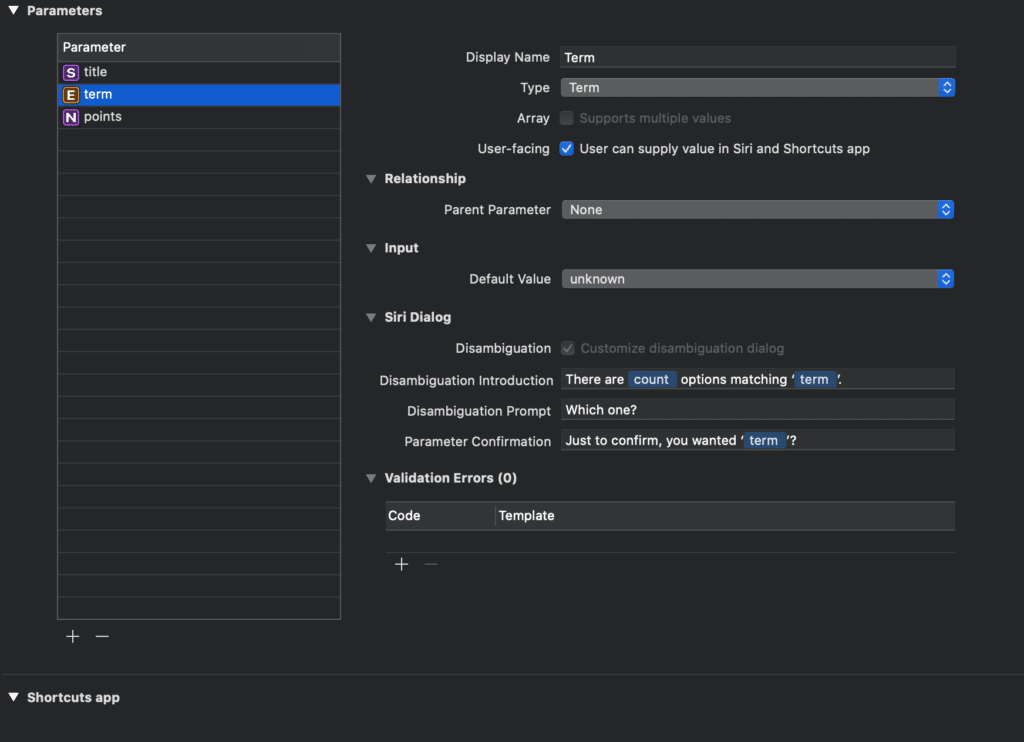
But before we add parameters, let’s add enum. In this way, we give the user suggestions (options to choose). Click the “+” button, choose New Enum, give a name Term. Let’s add cases to existing case .unknown – .shortTerm and .longTerm.
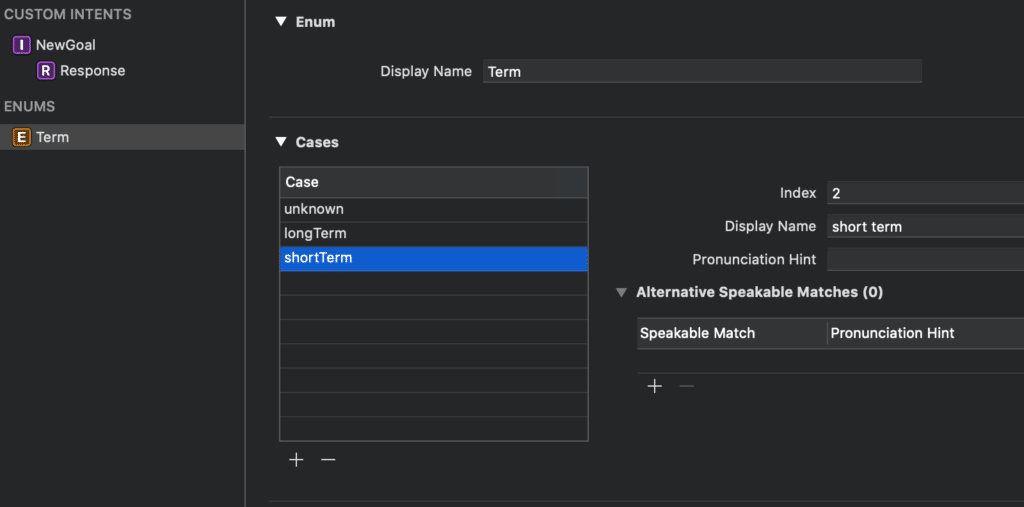
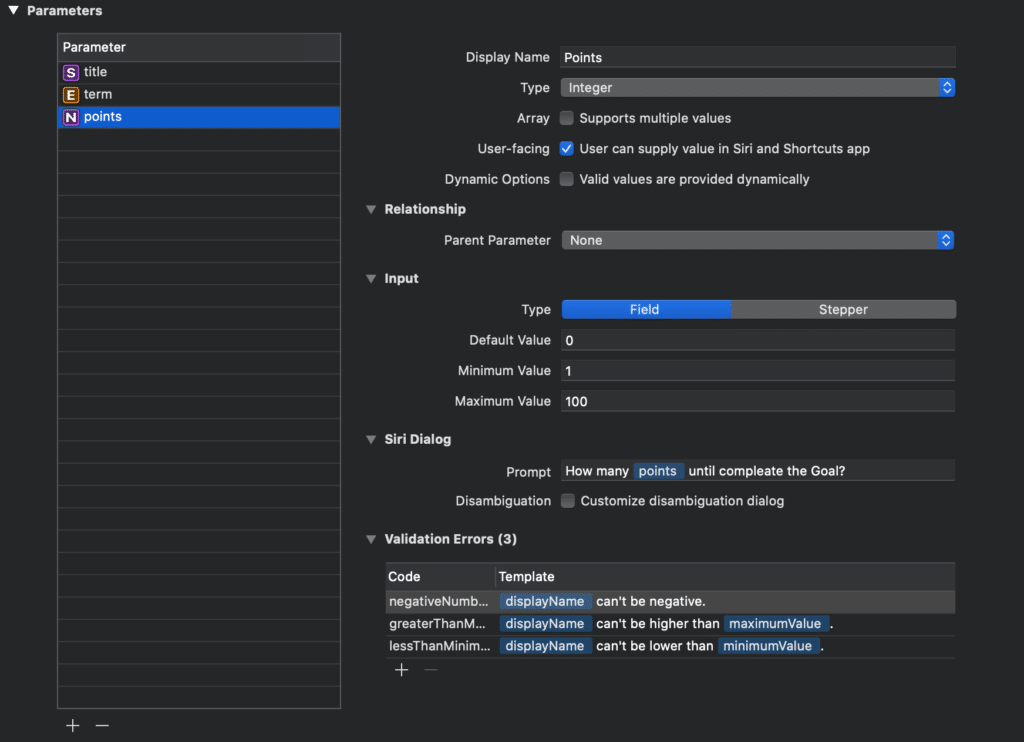
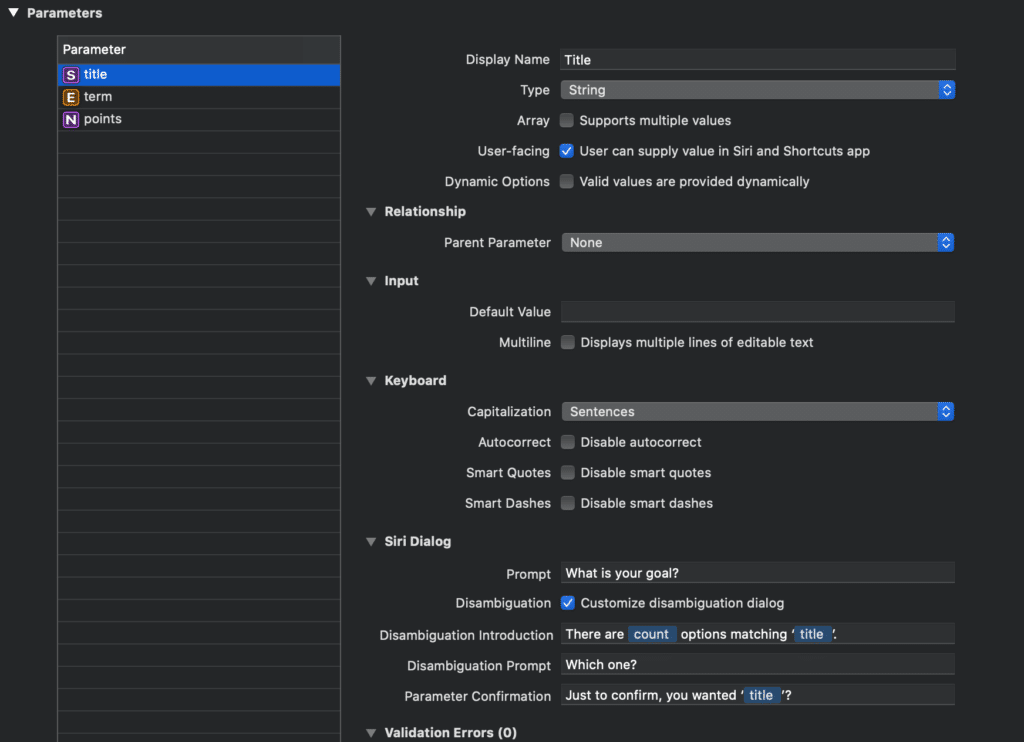
Go back to NewGoal intent and add new parameters: title, term, points.
Describing some parameter settings, we will not touch all lines but just most important. You can feel free to play with all these settings and check how they influence Siri.
- Display Name – the name of the parameter outside of the App, for example, Shortcuts App.
- Type – the type of your parameter. It can be one of the System Types, enum or custom type. For example, for the title parameter I chose String type, because eventually I will store it as a String in my App. For the term parameter, I’m using created Term enum. It’s very important to choose the right parameter since it affects the questions that Siri will ask.
- User-facing – choose enabled. This parameter allows you to use Siri and Shortcuts App.
- Prompt – actual Siri’s question…
6. User-Configurable Shortcuts-params
From Xcode, you can add shortcuts that users can configure in the Shortcuts app. Just fill the summary, using the parameters that you need for this shortcut.
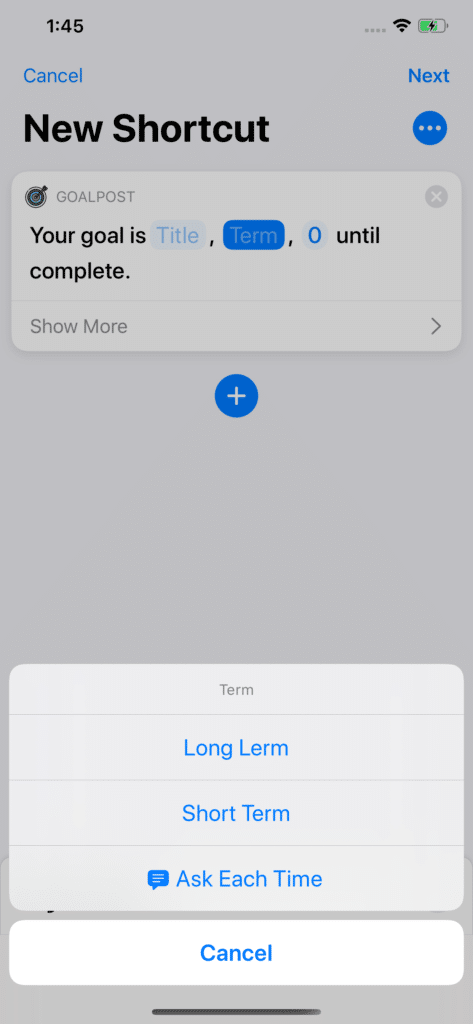
7. Setting Response and Output
We can add output to Siri that the user can get after success response. In our case, we show to the user how many saved Goals we have.
An intent response represents the result of the intent’s action. We can define Voice-only dialog and Printed dialog. It allows the user to see or hear the result.
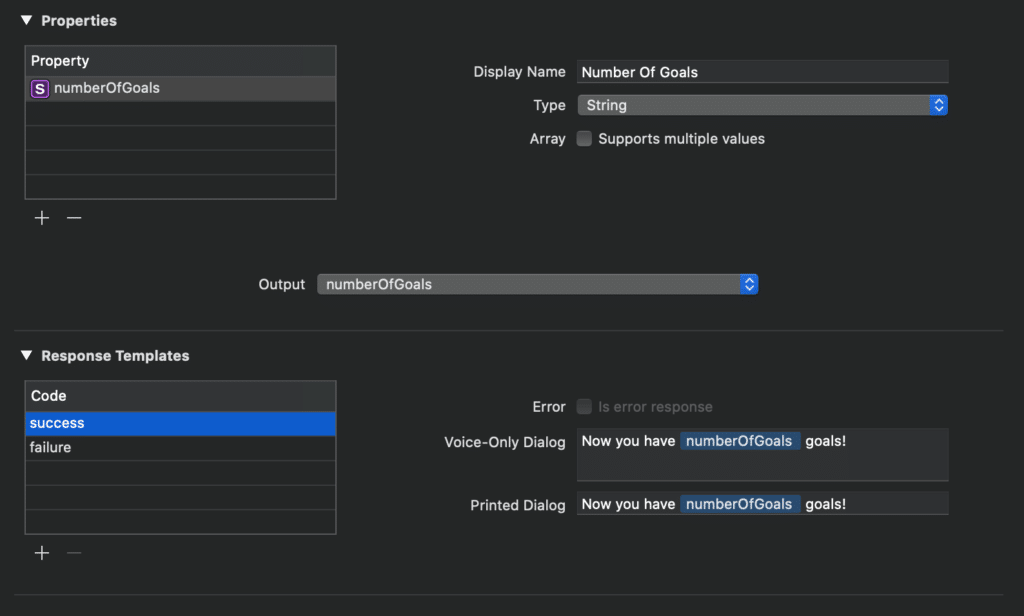
8. Handling intent
Yes, for now, we finished with the “settings” and it’s time to write some code ???
Before we handle the intent, we’ll do some preparation. Because Intent Extensions and our app have different membership targets let’s create an App Group. Tap on our project in a project navigator and tap on the Signing and Capability tab and pres “+ Capability“. Then select App Groups.
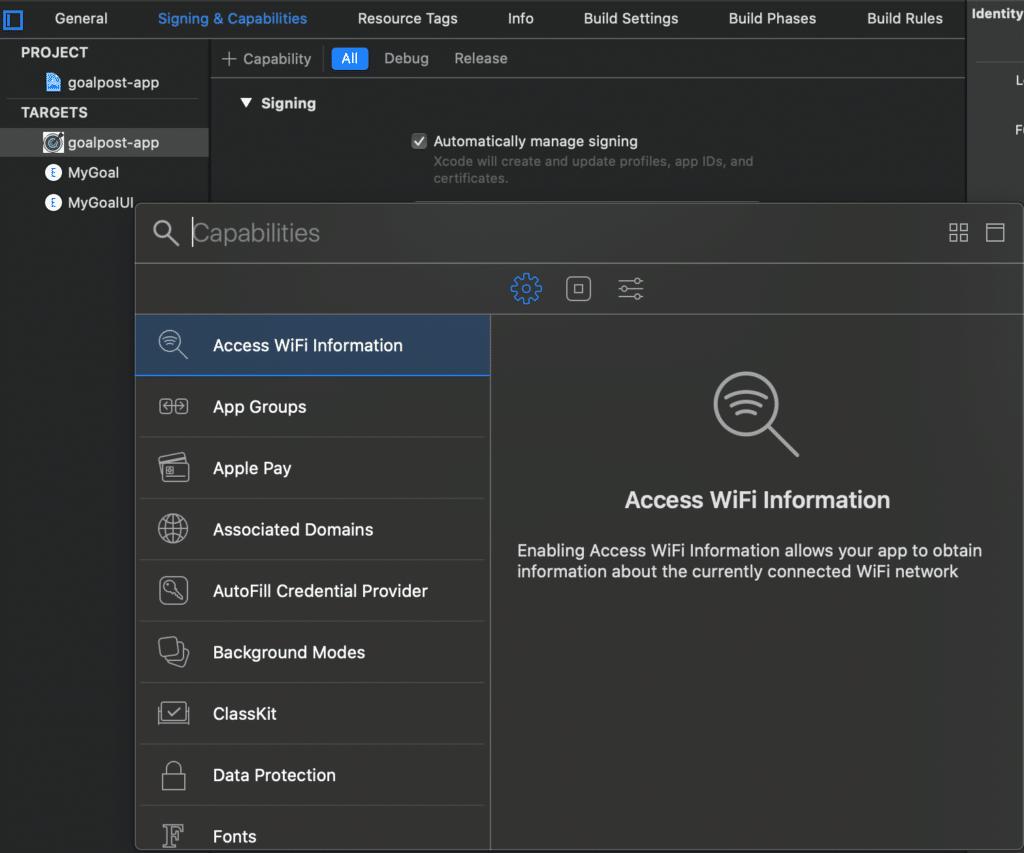
Press the “+” button and add a unique name. You can use bundle identifier to create a name, for example: group.bundleExample. Add same App Group to your intent and intentUI.
To use Group App add new Swift File and add some code:
import Foundation

struct SharedUserDefaults {
    static let suitname = "group.bundleExample"

    struct Keys {
        static let title = "title"
        static let term = "term"
        static let points = "points"
        static let goalsCount = "goalsCount"
    }
}
Cool… In IntentHandler.swift file we start work with our intent. Let’s check our intent before using it. If it’s needed by our intent we’ll pass it to MyGoalIntentHandler.swift where we will handle this intent. Add this code to IntentHandler.swift and create a new swift file MyGoalIntentHandler.swift
import Intents

class IntentHandler: INExtension {

    override func handler(for intent: INIntent) -> Any {
                guard intent is NewGoalIntent else {
                    fatalError("Unhandled Intent error : \(intent)")
                }
        return MyGoalIntentHandler()
    }
}
Here you add automatically the missing resolve and handle methods.

import UIKit
import Intents

let sharedUserDefaults = UserDefaults(suiteName: SharedUserDefaults.suitname)

class MyGoalIntentHandler : NSObject, NewGoalIntentHandling {
    func handle(intent: NewGoalIntent, completion: @escaping (NewGoalIntentResponse) -> Void) {
        switch intent.term {
        case .longTerm:
            sharedUserDefaults?.set("Long Term", forKey: SharedUserDefaults.Keys.term)
        case .shortTerm:
            sharedUserDefaults?.set("Short Term", forKey: SharedUserDefaults.Keys.term)
        default:
            sharedUserDefaults?.set("", forKey: SharedUserDefaults.Keys.term)
        }

        sharedUserDefaults?.set(intent.title!, forKey: SharedUserDefaults.Keys.title)
        sharedUserDefaults?.set(intent.points, forKey: SharedUserDefaults.Keys.points)

        let goalsCount = sharedUserDefaults?.integer(forKey: SharedUserDefaults.Keys.goalsCount)

        completion(NewGoalIntentResponse.success(numberOfGoals: String((goalsCount ?? 0) + 1) ))
    }

    func resolveTitle(for intent: NewGoalIntent, with completion: @escaping (INStringResolutionResult) -> Void) {
        guard let title = intent.title else {
            completion(INStringResolutionResult.needsValue())
            return
        }
        completion(INStringResolutionResult.success(with: title))
    }

    func resolveTerm(for intent: NewGoalIntent, with completion: @escaping (TermResolutionResult) -> Void) {
        if intent.term == .unknown {
          completion(TermResolutionResult.needsValue())
        } else {
          completion(TermResolutionResult.success(with: intent.term))
        }
    }

    func resolvePoints(for intent: NewGoalIntent, with completion: @escaping (NewGoalPointsResolutionResult) -> Void) {
        guard let points = intent.points else {
            completion(NewGoalPointsResolutionResult.needsValue())
            return
        }
        completion(NewGoalPointsResolutionResult.success(with: Int(truncating: points)))
    }
}
OK, now as you can see we successfully handled our intent. What is remained for us is to add some UI for our Siri response.
8. Add UI
We will not focus on UI since I assume that if you familiar a little bit with Swift and Xcode you can do for yourself and even better ?. But still, I’ll show how I did it in MyGoals App.
At IntentViewController.swift you add method configureView. Here we check intent handling status. If it’s a success, we attaching our View with desirable size.
func configureView(for parameters: Set<INParameter>, of interaction: INInteraction, interactiveBehavior: INUIInteractiveBehavior, context: INUIHostedViewContext, completion: @escaping (Bool, Set<INParameter>, CGSize) -> Void) {

        guard let intent = interaction.intent as? NewGoalIntent else {
            completion(false, Set(), .zero)
            return
        }

        if interaction.intentHandlingStatus == .success {
            let viewController = GoalCreatedViewController(for: intent)
            attachChild(viewController)
            completion(true, parameters, desiredSize)

        } else {
            completion(false, parameters, .zero)
        }

        completion(false, parameters, .zero)
    }

      private var desiredSize: CGSize {
          let width = self.extensionContext?.hostedViewMaximumAllowedSize.width ?? 320
          return CGSize(width: width, height: 180)
      }

private func attachChild(_ viewController: UIViewController) {
        addChild(viewController)

        if let subview = viewController.view {
            view.addSubview(subview)
            subview.translatesAutoresizingMaskIntoConstraints = false

            // Set the child controller's view to be the exact same size as the parent controller's view.
            subview.widthAnchor.constraint(equalTo: view.widthAnchor).isActive = true
            subview.heightAnchor.constraint(equalTo: view.heightAnchor).isActive = true

            subview.centerXAnchor.constraint(equalTo: view.centerXAnchor).isActive = true
            subview.centerYAnchor.constraint(equalTo: view.centerYAnchor).isActive = true
        }

        viewController.didMove(toParent: self)
    }
}
Let’s create a view controller for displaying our result. Add new Cocoa Touch Class with Xib file – GoalCreatedViewController.swift. Add this code to the created view controller and some design to Xib:
class GoalCreatedViewController: UIViewController {

    private let intent: NewGoalIntent

    @IBOutlet var goalView: GoalView!

    init(for todoIntent: NewGoalIntent) {
        intent = todoIntent
        super.init(nibName: "GoalCreatedViewController", bundle: Bundle(for: GoalCreatedViewController.self))
    }

    required init?(coder: NSCoder) {
        fatalError("init(coder:) has not been implemented")
    }

    override func viewDidLoad() {
        super.viewDidLoad()

        goalView.goalTitile.text = intent.title
        goalView.goalPoints.text = "Points until complete: \(String(describing: intent.points))"

        switch  intent.term {
        case .unknown:
            goalView.goalPoints.text = ""
        case .longTerm:
            goalView.goalPoints.text = "Long Term Goal"
        case .shortTerm:
            goalView.goalPoints.text = "Short Term Goal"
        default:
            goalView.goalPoints.text = ""
        }
    }
}

class GoalView: UIView {
    @IBOutlet weak var goalTitile: UILabel!
    @IBOutlet weak var goalType: UILabel!
    @IBOutlet weak var goalPoints: UILabel!
}
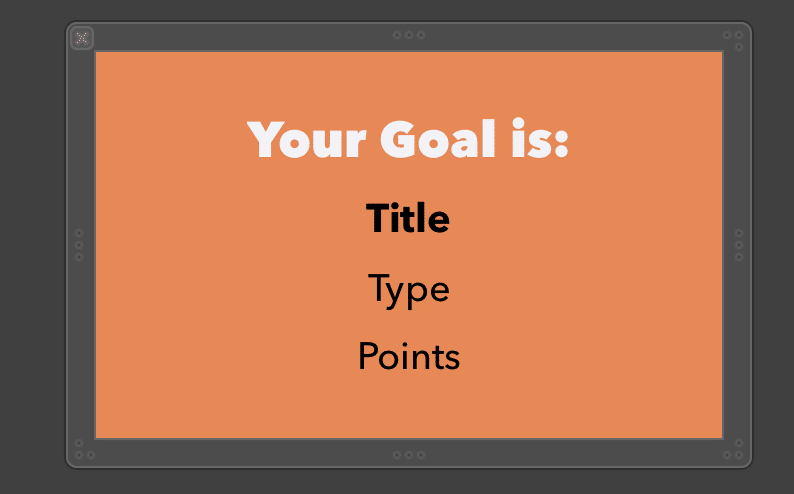
This is how UI looks like. You can customise Siri and fill it with necessary shortcuts-params that we’ve got from the intent and the ios App.
9. Time to try!
10. Summary
It’s a very useful feature for apps that give user an opportunity to control some of the functionalities through the air pods, home pod, car play etc… Also, with Apple’s great Shortcuts App, you can create automated scenarios using not only shortcuts of your app but different shortcuts from different apps.
Interested? Read about face recognition on iOS
