
Augmented reality makes user experience objects appearance in 2D or 3D in the real world. Those objects are seen from the camera and can be defines to stay in a certain position relatively to the user’s device. The ARKit helps us to bring augmented reality to our app in easier way. It’s availably since IOS 11 and had many improvements since then. This frameworks uses back and front camera, device position and orientation and advanced camera scene processing.
In the following tutorial will focus on using ARKit with SceneKit.
Example code:
https://github.com/msmobileapps/Augmented-Reality-IOS-Blog
So let’s get started. Open Xcode and create new Augmented reality project.

If you run the project as is you will notice a ship 3D model floating in front of you.

If you look at the viewDidLoad you will notice already written code. Making the ViewController the delegate of sceneView. Defining showsStatistics to true (the bar in the bottom of the screen that show the scene statistics). You may add the scene showFeaturePoints debug options to see the points the ARKit is finding in order to process the scene. Creation of the ship model and assigning it to the sceneView. Let’s put those 2 last lines in comment so the initial model won’t bother us.
Let’s set up ARCoachingOverlayView in viewWillAppear function. It’s a view that gives a visual instruction to the user how to move the device’s camera so the scene will set up properly. Assign the coaching view to the scene view, add proper constraints, set activatesAutomatically to true, set the goal to the wanted one (we will choose horizontal). Also if wanted you can make the ViewController implement ARCoachingOverlayViewDelegate and add the coachingOverlayViewWillActivate and coachingOverlayViewDidDeactivate functions to better manage the coaching view.
fileprivate func setUpCoachingOverlay() {
    let coachingOverlay = ARCoachingOverlayView()

    coachingOverlay.session = sceneView.session
    coachingOverlay.delegate = self

    coachingOverlay.translatesAutoresizingMaskIntoConstraints = false
    sceneView.addSubview(coachingOverlay)

    NSLayoutConstraint.activate([
        coachingOverlay.centerXAnchor.constraint(equalTo: view.centerXAnchor),
        coachingOverlay.centerYAnchor.constraint(equalTo: view.centerYAnchor),
        coachingOverlay.widthAnchor.constraint(equalTo: view.widthAnchor),
        coachingOverlay.heightAnchor.constraint(equalTo: view.heightAnchor)
    ])

    coachingOverlay.activatesAutomatically = true
    coachingOverlay.goal = .horizontalPlane
}

func coachingOverlayViewWillActivate(_ coachingOverlayView: ARCoachingOverlayView) {

}

func coachingOverlayViewDidDeactivate(_ coachingOverlayView: ARCoachingOverlayView) {

}
The coaching view looks like this:


After we set up the coaching, we have to choose which scene tracking configuration we would like to use. There are 7 deferent types:
- ARWorldTrackingConfiguration – Using the device position and orientation, tracking surfaces, people, any known images and objects using the device’s back camera.
- ARBodyTrackingConfiguration – Tracking people, images and surfaces using the device’s ball camera.
- AROrientationTrackingConfiguration – Tracking only the device’s orientation using the back camera.
- ARImageTrackingConfiguration – Tracking only images using the back camera.
- ARFaceTrackingConfiguration – Tracking only faces with their movements and expression using the front (selfie) camera.
- ARObjectScanningConfiguration – Collecting high-fidelity data about specific objects you want your app to recognize later.
- ARPositionalTrackingConfiguration – Tracking only device’s position using the back camera.
We will focus on 3 most common configuration: world, body and face tracking.
AR World Tracking Configuration
At the beginning, in viewWillAppear functions we have to configure the following properties:
let configuration = ARWorldTrackingConfiguration()
configuration.planeDetection = [.horizontal, .vertical]
configuration.frameSemantics.insert(.personSegmentationWithDepth)
You may also add environment texturing for more realistic rendering option:
if #available(iOS 12.0, *) {
    configuration.environmentTexturing = .automatic
}
And last, run the session with these configuration and at viewWillDisappear function pause the scene:
sceneView.session.run(configuration, options: [.resetTracking, .removeExistingAnchors])Make the ViewController implement SCNNodeRendererDelegate. Add renderer(:didAdd:for) function, this function get called every time a new anchor is added to the scene.
Horizontal And Vertical Anchors
First, let’s try to visualize horizontal and vertical anchors. Make sure the anchor is ARPlaneAnchor type. For the beginning we will create a white rectangle that is going to cover the horizontal and the vertical surfaces. Use SCNPlane to create 2D rectangle and make a new node with it.
Set it the centre position of the anchor add it to the scene node:
if let planeAnchor = anchor as? ARPlaneAnchor {
    let plane = SCNPlane(width: CGFloat(planeAnchor.extent.x), height: CGFloat(planeAnchor.extent.z))
    plane.firstMaterial?.diffuse.contents = UIColor(white: 1, alpha: 0.75)

    let planeNode = SCNNode(geometry: plane)

    planeNode.position = SCNVector3Make(planeAnchor.center.x, planeAnchor.center.x, planeAnchor.center.z)
    //rotate the plane anchor 90 degrees
    planeNode.eulerAngles.x = -.pi / 2

    node.addChildNode(planeNode)
}
Now if you run the app you will see something like this:

In the next step we will add some other objects on the plane surfaces, such as objects and images.
For the example we will place object on the horizontal surface and image on the vertical one. In order to do that, let’s create a “SceneKit Scene File” and add it a “3D Text” object.
Check if the plane’s anchor alignment is horizontal, if true create SCNScene by the name of the file. Iterate on the scene root node’s child and add them to the scene node:
guard let scene = SCNScene(named: "art.scnassets/msapps.scn") else {
    print("Could not load scene!")
    return
}

    let childNodes = scene.rootNode.childNodes
    for childNode in childNodes {
    sceneNode.addChildNode(childNode)
}
Then, set the scene node scale and position and add it to the node. This will add the object from the file to the first detected horizontal surface.
sceneNode.scale = SCNVector3(0.1, 0.1, 0.1)
sceneNode.position = SCNVector3Zero
node.addChildNode(sceneNode)
Next, we will handle vertical anchors creations. The app will add image to a first detected vertical surface. Check if the plane’s anchor alignment is vertical, if true create SCNPlane with the wanted width and height. Set it a material with diffuse content of an UIImage. Create SCNNode object with the SCNPlane, set it a position and add it to the node:
let plane = SCNPlane(width: 0.4, height: 0.25)
let material = SCNMaterial()
material.diffuse.contents = UIImage(named: "ms-c-logo")
plane.materials = [material]

let planeNode = SCNNode(geometry: plane)

planeNode.position = SCNVector3Make(planeAnchor.center.x, planeAnchor.center.x, planeAnchor.center.z)
//rotate the plane anchor 90 degrees
planeNode.eulerAngles.x = -.pi / 2

node.addChildNode(planeNode)
In order to keep the surfaces indication updated in real time, add renderer(:didUpdate:for) function, which tells the delegate that any properties of the node scene child were updated. Inside add code that updates the node’s position to his current one:
if let planeAnchor = anchor as? ARPlaneAnchor,
    let planeNode = node.childNodes.first,
    let plane = planeNode.geometry as? SCNPlane {

        plane.width = CGFloat(planeAnchor.extent.x)
        plane.height = CGFloat(planeAnchor.extent.z)
        planeNode.position = SCNVector3Make(planeAnchor.center.x, 0, planeAnchor.center.z)
}
The result will look like this:

Custom Nodes
After we learned to handle plane anchors, let’s add our own ones. Add tap gesture to the scene view. In the action function, get the currentFrame from the scene view session. Add translation property of type simd_float4x4 and set the object 2 meters away from the camera and merge it into with the camera transform:
var translation = matrix_identity_float4x4
translation.columns.3.z = -2
let transform = simd_mul(currentFrame.camera.transform, translation)
Create an ARAnchor object with the name “tap” and set it to the “transfrom” parameter. Add this anchor to the scene view session.
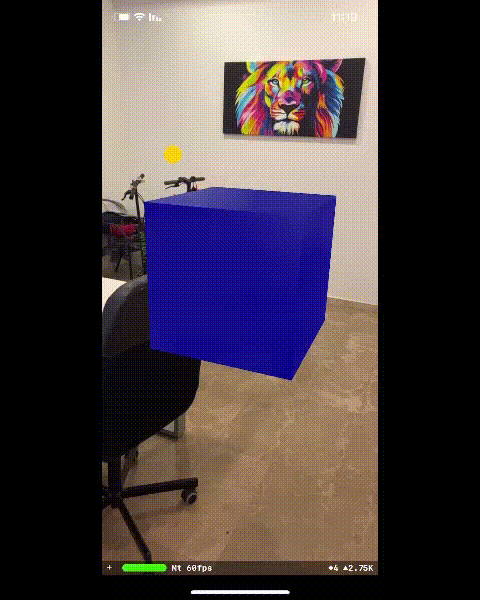
Then create another “SceneKit Scene File” and add it a box with the wanted design properties.
Back in the ViewController’s renderer(:didAdd:for) function, add another if statement which checks if the anchor’s name is “tap”. Then load the box scene we created earlier:
guard let scene = SCNScene(named: "art.scnassets/box.scn") else {
    print("Could not load scene")
    return
}
let childNodes = scene.rootNode.childNodes
Set the scene scale, the node position and append it to the scene node. Also recommended to create an array for better management of this added nodes.
sceneNode.scale = SCNVector3(0.1, 0.1, 0.1)
for childNode in childNodes {
    let columns = anchor.transform.columns
    let anchorZ = SCNVector3Make(columns.3.x, columns.3.y, columns.3.z)
    let position = SCNVector3(SCNVector3Zero.x, SCNVector3Zero.y, anchorZ.z)
    childNode.position = position
    nodesBoxes.append(childNode)
    node.addChildNode(childNode)
}
Try running the app and you will see the following result:
In order to delete a node you have to remove it from his parent:
node.removeFromParentNode()Node Actions
In the next step we would like to add the nodes some actions. All the actions are created by SCNAction class. The variation of the actions are:
- Rotate
- Scale
- Move
- FadeIn / FadeOut
- Hide
- Play Audio
For the example we will select rotate and scale actions. First let’s create SCNAction rotateBy action with 5 seconds duration. Then create 2 SCNAction scale actions, one that scales up and the other down. Add those 2 action into a sequence so they will start one after another. Add the created sequence and the rotate action to a group. Now, if you like, add repeatForever to the actions group and run the action on the node:
let rotate = SCNAction.rotateBy(x: 0, y: CGFloat(Float.pi), z: 0, duration: 5.0)
let scaleUp = SCNAction.scale(by: 1.1, duration: 2)
let scaleDown = SCNAction.scale(by: 1/1.1, duration: 2)
let scaleSequence = SCNAction.sequence([scaleUp, scaleDown])
let rotateAndScale = SCNAction.group([rotate, scaleSequence])
let repeatForever = SCNAction.repeatForever(rotateAndScale)
node.runAction(repeatForever)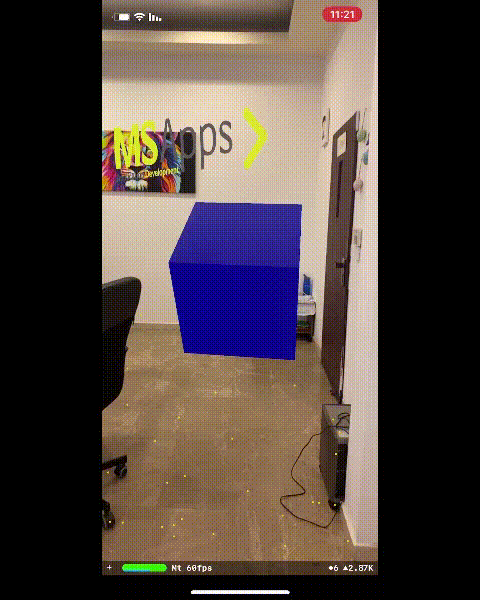
Handle Tap On Nodes
In order to visualise the taps better let’s add long tap gesture to the scene view. In the tap action handler get the CGPoint location of the tap on the view. Then use the hitTest function of the scene view to convert the CGPoint into SCNHitTestResult. Iterate on the nodes array (that I recommend you to create) and check if there is a match with the hitTest result. If true, add it the action we created before.
if(gestureRecognize.view == self.sceneView){
    let viewTouchLocation = gestureRecognize.location(in: sceneView)
    guard let result = sceneView.hitTest(viewTouchLocation, options: nil).first else {
        return
    }
    for node in nodesBoxes{
        if node == result.node{
            node.removeAllAnimations()
            addAnimation(node: node)
        }
    }
}
Handle Device Distance From Node Change
In order to handle those changes we would have to add renderer(:updateAtTime) function, which tells the delegate to perform any updates before the actions, animations or evaluations. Inside, get the ARCamera instance from the scene view current frame. Get the transform from the camera and create new position with it (SCNVector3).
if let camera = sceneView.session.currentFrame?.camera {
     let transform = camera.transform
     let cameraPosition = SCNVector3(transform.columns.3.x, transform.columns.3.y, transform.columns.3.z)
}
Now, for example, we will check if the distance to the node is less or more than 2 meters. If less pain the box in blue, else pain it in red. Iterate on the nodes array and calculate the distance between the camera’s position to the node’s position. Check the result and handle the colour change properly:
for node in nodesBoxes{
    let vectorPosition = node.position
    let xd = vectorPosition.x - cameraPosition.x
    let yd = vectorPosition.y - cameraPosition.y
    let zd = vectorPosition.z - cameraPosition.z

    //calculate the distance
    var distance = Float(sqrt(xd * xd + yd * yd + zd * zd))

    if (distance < 0){
        distance = (distance * -1)
    }
    if distance < 2{

        changeNodeColorOf(node, to: .blue)
    }
    else{
        changeNodeColorOf(node, to: .red)
    }
}
The change colour function:
func changeNodeColorOf(_ node:SCNNode,to color:UIColor){
    node.geometry = node.geometry?.copy() as? SCNGeometry
    node.geometry?.firstMaterial = node.geometry?.firstMaterial!.copy() as? SCNMaterial
    node.geometry?.firstMaterial?.diffuse.contents = color
}
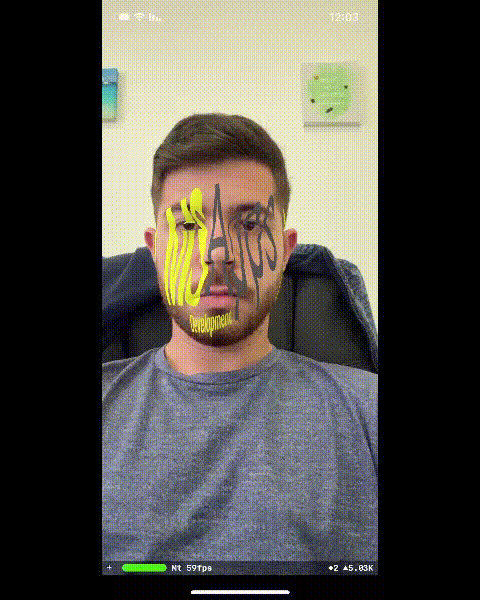
AR FaceTracking Configuration
The FaceTracking is available from IOS 11, so, before we begin, in viewWillAppear functions we have to check If FaceTracking is supported. Configure the following properties and run the session with those properties:
guard ARFaceTrackingConfiguration.isSupported else { return }
let configuration = ARFaceTrackingConfiguration()
configuration.isLightEstimationEnabled = true
sceneView.session.run(configuration, options: [.resetTracking, .removeExistingAnchors])
Face Tracking
The rendered(:nodeFor) function correspond to any new anchor created in the scene view. In the function check if the anchor is an ARFaceAnchor. Create ARSCNFaceGeometry with the scene view device. Get the first material form the face geometry and set the content to an UIImage. Create a SCNNode with the face geometry and return it.
func renderer(_ renderer: SCNSceneRenderer, nodeFor anchor: ARAnchor) -> SCNNode? {

    if anchor is ARFaceAnchor{

        guard let faceGeometry = ARSCNFaceGeometry(device: sceneView.device!) else {return nil}
        let material = faceGeometry.firstMaterial!

        material.diffuse.contents =  //UIImage
        material.lightingModel = .physicallyBased

        let contentNode = SCNNode(geometry: faceGeometry)
        faceNode = contentNode
        return contentNode
    }
    return nil
}
Notice I set the created SCNNode to a faceNode parameter. So create a faceNode parameter in the ViewController and assign it with the returned node. It will help us to handle any future changes in the node.

Expressions Changes
In the next step we will handle face expressions changes. In the renderer(:didUpdate:for) function we will handle those changes. Check is the anchor is ARFaceAnchor type. If so, get the geometry from the faceNode parameter we created before and cast it to ARSCNFaceGeometry. Next, we will check the changes of the face. Get the blendShapes dictionary from the ARFaceAnchor and get the value for the wanted key. Every key is a change of some movement. For example are going to handle mouth opening changes, or as the key called “jawOpen”.
Let’s check that the value of that key is less than 0.6, it will indicate an open mouth. If true, change the material contents to a different image.
At last, update the ARSCNFaceGeometry with the new face anchor’s geometry.
if let faceAnchor = anchor as? ARFaceAnchor,
    let faceNode = self.faceNode,
    let faceGeometry = faceNode.geometry as? ARSCNFaceGeometry{

    let material = faceGeometry.firstMaterial!

    if faceAnchor.blendShapes[.jawOpen]!.doubleValue > 0.6{
         material.diffuse.contents = //Different UIImage
    }
    else{
         material.diffuse.contents = //First UIImage
    }
    faceGeometry.update(from: faceAnchor.geometry)
}
Augmented Reality iOS BodyTracking Configuration
The BodyTracking is available from IOS 13, so, before we begin, in viewWillAppear functions we have to check If BodyTracking is supported. Configure the following properties with frameSemantics of bodyDetection and run the session:
guard ARBodyTrackingConfiguration.isSupported else { return }
let configuration = ARBodyTrackingConfiguration()
configuration.isLightEstimationEnabled = true
configuration.automaticSkeletonScaleEstimationEnabled = true
configuration.frameSemantics.insert(.bodyDetection)
sceneView.session.run(configuration, options: [.resetTracking, .removeExistingAnchors])
Next, in the rendered(:nodeFor) function check if the new anchor is ARBodyAnchor type. If so, you can get the position of the anchor’s skeleton:
let transform = bodyAnchor.skeleton.jointLocalTransforms.first!
let position = SCNVector3Make(transform.columns.3.x, transform.columns.3.y, transform.columns.3.z)
You can take this position value and create a new SCNode with it, or do anything else you would like. ARBodyAnchor updates can be handles in the session(:didUpdate) function. Read similar article about augmented reality on out blog
One thought on “Augmented Reality iOS”
Leave a Reply
You must be logged in to post a comment.
Pingback: Face Recognition IOS – MSAPPS