
Introduction
Development for Apple Watch has gone many changes, from its 2015 debut, when the device couldn’t handle REST API without its iPhone Hosting APP counterpart, up until current WatchOS 5, with its cellular plane, Core Bluetooth support for BLE devices and a general fast and responsive performances. According to Apple’s last WWDC (Apple Worldwide Developers Conference), watchOS 6, coming to a wrist near you towards the end of 2019, will be even better, featuring such things as an in Watch App Store, Voice memos, audio books and much more. As an Apple long loyal customer, it took me a while, to warm up to the watch. But once I’ve realised its massive potential in keeping you connected with your love ones ,tracking up coming events, listen to music and even answering phone calls – in a sort of Hands Off approach – all while having my iPhone safely tuck away in my backpack, I was hooked.
As an iOS developer, I find the frameworks, connectivity, UI and general setup of the Watch Extension in Xcode to be another well polished technology product by Apple. However, there are always some small setbacks when first stepping out of your 1st Watch Extension tutorial and into a real live App. For that reason, I would like to share some of our own experience at MSApps, regarding clearing potential roadblocks in designing, building and release of an iOS App with a Watch Extension.
Design Patterns and Code Sharing
One of the Biggest challenge is to allow the extension, easy access points to the main App’s code. It is not just as simple as adding the watch extension to the Target Membership of any swift file with code we want to share with the watch because you should be mindful that certain frameworks are not accessible to both iOS App and watch extension like UIKIT for example. This also means that any framework which has UIKIT as its dependency will also fail to share with the watch extension. A good design pattern, such as MVVM is crucial for a correct integration of watch extension in your project.
The watch extension should be regarded as the View part of the MVVM pattern. The most obvious example is handling Network Connection, in a separate NetworkManager Class which can be shared with the watch. You must avoid at all cost duplicating code by making sure any utils code, business logic or network connection managing – which may be necessary for the watch functionality – be separate away from the main App ViewControllers. Whether you use NSURLConnection or a popular 3rd party library, like Alamofire, Give extra attention to abstract network requests and parsing results Data away from the ViewController. Your ViewController should just call a method in the NetworkManager class and pass it unique success and failure blocks, that way, both the watch and main App will be able to fetch data from remote server using the same code of the NetworkManager while performing different tasks upon completion.
Watch Connectivity
In addition to code structure and correct architecture, passing information from the main App to the watch extension and vice versa is crucial despite the watch ability to fetch data (using wifi or embedded sim) from the network without the main App. Many REST API these days, use the JWT as a mean of authenticating the user credentials. The traditional login process occurs on the iPhone App, produces a Token, which is kept in a persistent container, such as User Defaults or more preferable, Keychain.
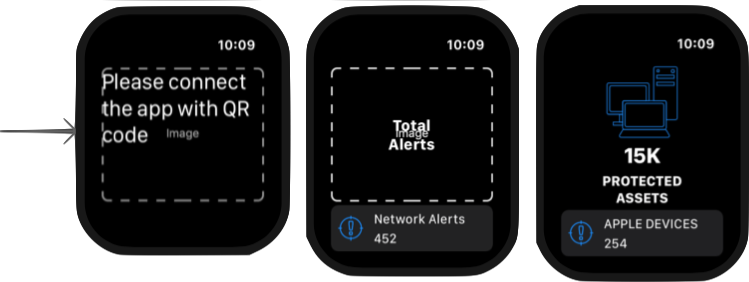
The Token is then added as a header field to all network requests, thus, correctly identifying and fetching the user’s data from the server side, without compromising the user’s password. Since typing your user name and password on the watch face is not practical, and neither scanning a QR code, it can be very difficult to login in for the 1st time to your Watch Extension App from the watch, which means, we much rather, prefer to login on the iPhone APP and just pass the token to the watch extension to use when fetching data from server.
Enter watchConnectivity, a framework that can be imported on both the main App and the watch Extension targets, which handles the communication for you by a simple implementation of callback functions. There are two types of communication you can use: interactive messaging and background transfers.
Interactive Messaging is used in situations where the transfer of information needs to happen immediately. It is best use when both apps are active, so do take it into considerations, because most watch apps user interactions will be short and probably occur while the phone is outside the user’s immediate reach.
Background Transfer let iOS and watchOS transfer data between them even if just 1 app is active. The active app sends data and the other app will receive it upon waking up. There are 3 types of transfer: User Info (all data sent is received in the order it was sent – FIFO), Application Context (only the most relevant data is received) and File.
For sending a Token, although it may seem that Application Context is the way to go (if the main App just received a newer token, no need to still send the old one), I’ve personally found that User Info approach is much more robust.
And finally, be advised that if you’re thinking about sharing information between the main App and the watch Extension via App Groups, it is no longer possible since watchOS 2, since the watch doesn’t have access to the main App group container, you have to use Watch Connectivity framework.
WatchKit GUI
Watch Extension has specific UI elements similar in names and meaning to UIKIT, such as InterfaceController vs ViewController or WKInterfaceTable vs UITableView. A lot of elements available to us in iOS are also available in the watch Extension, such as labels, images, tables, buttons, switches, sliders, maps and menus. Having to pick exactly the ncececcery information to show the user, definitely make designing for the watch App a UI/UX challenge. At first, you will find it, a bit restrictive. It is not a constraint based design, as in AutoLayout but rather arranging the elements in Groups , which are a horizontal / vertical layouts similar to UIStackView. You’re goal should be to limit the interaction needed by the user to simple gestures such as pressing buttons, quick swipes, force touch etc…
Another great feature of the watch is the Digital Crown which is similar to the traditional crown found in mechanical watches. In the Apple Watch it serves for accelerated scrolling, which means you should, in my opinion , adopt a horizontal-page-based-navigation between controllers, while having each controller layout its content in a vertical direction like a UITableView, because the Digital Crown is just awesome in lighting speed scrolling.
Navigation, layout and sharing information forward between controllers is even easier than using our beloved segues. By invoking the reloadRootControllers(withNames:contexts:) we can reload \ re-render a controller, transition to a new controller while passing it information and even configure a page-based navigation style. For example, say we desire to re-render the GUI following fetching of new data from the server. By using Swift Observers we can easily reload the screen and give the context (that’s the information we pass forward) which is the new Data Model from the server:
var networkModel: DashboardNetworkModel? {
    willSet {
        guard let model = newValue  else {
            return
        }
        InterfaceController.reloadRootControllers(withNames:    ["Dashboard","Assets"], contexts: [model,model])
    }
}
The names in the controller’s array are the names as appear in the storyboard. We can catch and interpret the context in the controller’s override of the awake(withContext:) method as follows:
override func awake(withContext context: Any?) {
    super.awake(withContext: context)
    let model = context as? DashboardNetworkModel
    setGUIAccordingToNetworkModel(model);
}
When passing an array of controllers to the reloadRootControllers(withNames:contexts:) we are actually setting up a page-based-navigation in which, the order of the controller in the array decides the page number. A simple style attribute can toggle between default behaviour of paging horizontally upon swipe or paging vertically. Since reloadRootControllers(withNames:contexts:) is a Type Method, you may call it directly even without holding a reference to an InterfaceController instance. For example, you may call it from the ExtensionDelegate (Watch Extension version to AppDelegate) by invoking WKInterfaceController.reloadRootControllers(withNames: [“SplashScreen”], contexts: nil)
Conclusion
WatchKit (Apple Watch Development Kit) is an exciting framework. Apple has provided more than enough to build quite a complex yet functional app. Apple Watch is currently the most popular wearable device and as such, I strongly encourage to consider adding Watch Extension to any new App you develop. Granted, you should think a lot how to expose the most important key features in your app to the watch extension to keep it as simple and functional as much as possible.
Read about opportunities of Sign In With Apple
One thought on “Apple Watch”
Leave a Reply
You must be logged in to post a comment.
Pingback: Accessibility on iOS – MSAPPS