IOS provides an opportunity to make applications with built-in accessibility features. These features make your app accessible even for people with special needs or for disabled ones. Some of the main features are VoiceOver, Guided Access, Text to Speech, and more.
You are welcomed to see an example app in App Store:
https://apps.apple.com/us/app/accessibility-ios/id1489086250?ls=1
And it’s source code in Bitbucket:
https://github.com/msmobileapps/Accessibility-IOS-Blog
Speech
The speech framework is fast and accurate. This feature is made by Apple enables these options in your app:
- Convert text to speech
- Previously recorded audio to speech
- Live audio to speech
The speech recognition is available for many languages, but some of them are required internet connection, so always assume the connection is needed. Beside the help to the disabled users, the possibilities are endless. Any device running iOS 10 and above supports this feature.
In this part of the tutorial I will show you how to acquire those features in your app.
Text to speech:
First, in order to use this feature you have to import AVFoundation and adopt AVSpeechSynthesizerDelegate.
Initialize AVSpeechSynthesizer object and set the ViewController to be his delegate. This object serves as a manager for the speeches in the app.
After that, initialize AVSpeechUtterance object with the string you want him to speak.
Let utterance = AVSpeechUtterance(string: “Example”)Then, you can add some settings parameters:
- Voice – select the voice with the wanted language or with a specific identifier.
- Rate – controls the speed of the speech from 0 to 1 (default is 0.5).
- PitchMultiplier – controls the sharpness of each word from 0.5 – 2.
- Volume – controller the speech volume from 0 – 1.
- PreUtteranceDelay – time interval before start speaking.
- PostUtteranceDelay – time interval after speaking ended.
Add to the speak parameter of AVSpeechSynthesizer the AVSpeechUtterance instance. Now, all left is to control when you would like it to start/pause/continue/stop speaking by referring the AVSpeechSynthesizer instance.
The AVSpeechSynthesizerDelegate has the functions: didStart, didFinish, didPause, didContinue, didCancel, willSpeakRangeOfSpeechString.
Those function gives you better control on the event happening with the speech on your app.
Very important to define the right audio session as shown below, otherwise the right audio session category won’t be recognized and cause a crash.
do{
    try AVAudioSession.sharedInstance().setCategory(AVAudioSession.Category.playback)
    try AVAudioSession.sharedInstance().setActive(true)
}catch{
    print(error)
}
Example:
import UIKit
import AVFoundation

class TextToSpeechViewController: UIViewController, AVSpeechSynthesizerDelegate {

    override func viewDidLoad() {
        super.viewDidLoad()

        let avSpeechSynthesizer = AVSpeechSynthesizer()
        avSpeechSynthesizer.delegate = self

        setAudioCategoryToPlayback()

        //Creating speech object:

        let avSpeechUtterance = AVSpeechUtterance(string: "Example")

        avSpeechUtterance.voice = AVSpeechSynthesisVoice(language: "en")
        //utterance.voice = AVSpeechSynthesisVoice(identifier: "com.apple.ttsbundle.Karen-compact") -> another option

        avSpeechUtterance.rate = 0.5 // -> deafult, 0-1 range
        avSpeechUtterance.pitchMultiplier = 1 // -> deafult, 0.5-2 range
        avSpeechUtterance.volume = 0.5 //0-1 range
        avSpeechUtterance.preUtteranceDelay = 0
        avSpeechUtterance.postUtteranceDelay = 0

        //Managing the speech:

        if !avSpeechSynthesizer.isSpeaking{ //It's recommended to check if other speech is not already in progress

            avSpeechSynthesizer.speak(avSpeechUtterance) //start speech
        }
        else{
            //do some actions (maybe stop the last speech)
        }

        avSpeechSynthesizer.pauseSpeaking(at: .immediate) //pauses speech imidiatly
        //avSpeechSynthesizer.pauseSpeaking(at: .word) -> pauses after the word ends

        avSpeechSynthesizer.continueSpeaking() //resume speech

        avSpeechSynthesizer.stopSpeaking(at: .immediate) //stops speech imidiatly
        //avSpeechSynthesizer.stopSpeaking(at: .word) -> stops after the word ends
    }

    private func setAudioCategoryToPlayback() {
        do{
            try AVAudioSession.sharedInstance().setCategory(AVAudioSession.Category.playback)
            try AVAudioSession.sharedInstance().setActive(true)
        }catch{
            print(error)
        }
    }

    //AVSpeechSynthesizerDelegate delegate functions
    //can be used if any actions needed to be done when a certain thing happens
    func speechSynthesizer(_ synthesizer: AVSpeechSynthesizer, didStart utterance: AVSpeechUtterance) { }
    func speechSynthesizer(_ synthesizer: AVSpeechSynthesizer, didPause utterance: AVSpeechUtterance) { }
    func speechSynthesizer(_ synthesizer: AVSpeechSynthesizer, didContinue utterance: AVSpeechUtterance) {}
    func speechSynthesizer(_ synthesizer: AVSpeechSynthesizer, didFinish utterance: AVSpeechUtterance) { }
    func speechSynthesizer(_ synthesizer: AVSpeechSynthesizer, didCancel utterance: AVSpeechUtterance) { }
    func speechSynthesizer(_ synthesizer: AVSpeechSynthesizer, willSpeakRangeOfSpeechString characterRange: NSRange, utterance: AVSpeechUtterance) { }

}
Audio to speech:
This feature converts existed audio to a string.
In order to implement the audio to speech feature we have to import Speech and ask the user for a permission to use the speech recognizer.
Call SFSpeechRecognizer.requestAuthorization to send the request and add “Privacy – Speech Recognition Usage Description” to info.plist file.

SFSpeechRecognizer.requestAuthorization { (status) in
    switch status {
    case .authorized:
        print("Speech recognition authorized")
    case .denied:
        print("Speech recognition authorization denied")
    case .restricted:
        print("Not available on this device")
    case .notDetermined:
        print("Not determined")
    @unknown default:
        print("Unknown")
    }
}
Initialize SFSpeechRecognizer object and check if his instance isAvailable. If true, initialize SFSpeechURLRecognitionRequest object with an audio url (you have to provide an audio url to be able to use this feature).
guard let recognizer = SFSpeechRecognizer() else {
    print("Speech recognition not available for this locale")
    return
}

if !recognizer.isAvailable {
    print("Speech recognition is not available")
    return
}

let request = SFSpeechURLRecognitionRequest(url: url)
From the SFSpeechRecognizer instance call recognitionTask(with: request) and pass the SFSpeechURLRecognitionRequest to it. Make sure you got a valid result and get it’s final and best transcription.
recognizer.recognitionTask(with: request) { (result, error) in
    if result.isFinal {
      result.bestTranscription.formattedString
    }
}
Use the transcription string as you wish. Usually the value is set to a label.
Very important to define the right audio session as shown below, otherwise the right audio session category won’t be recognized and cause a crash.
do {
    try AVAudioSession.sharedInstance().setCategory(AVAudioSession.Category.playAndRecord, options: .mixWithOthers)
    try AVAudioSession.sharedInstance().setActive(true)
} catch {
    print(error)
}
Example:
import UIKit
import Speech

class AudioToSpeechViewController: UIViewController {

    override func viewDidLoad() {
        super.viewDidLoad()

        requestPermission()
        setAudioCategoryToPlayAndRecord()
        audioFileFrom(url: someAudioUrl) //Insert your audio url
    }

    private func requestPermission() {
        SFSpeechRecognizer.requestAuthorization { (status) in
            switch status {
            case .authorized:
                print("Speech recognition authorized")
            case .denied:
                print("Speech recognition authorization denied")
            case .restricted:
                print("Not available on this device")
            case .notDetermined:
                print("Not determined")
            @unknown default:
                print("Unknown")
            }
        }
    }

    private func setAudioCategoryToPlayAndRecord() {
        do {
            try AVAudioSession.sharedInstance().setCategory(AVAudioSession.Category.playAndRecord, options: .mixWithOthers)
            try AVAudioSession.sharedInstance().setActive(true)
        } catch {
            print(error)
        }
    }

    private func audioFileFrom(url: URL) {

      guard let recognizer = SFSpeechRecognizer() else {
        //SFSpeechRecognizer(locale: Locale(identifier: "en-US")) -> another init option with specific local
        print("Speech recognition not available for this locale")
        return
      }

      if !recognizer.isAvailable {
        print("Speech recognition is not available")
        return
      }

      let request = SFSpeechURLRecognitionRequest(url: url)

      recognizer.recognitionTask(with: request) { (result, error) in

        guard let result = result else { return }

        if result.isFinal {
            print(result.bestTranscription.formattedString) //You can put this transcription into a label or any other use your app requires

            for word in result.bestTranscription.segments{
                print(word) //Each word seperatly
            }
        }
      }
    }

}
Live audio to speech:
This feature is converting live audio that comes from the device microphone into a string.
First, in addition for the “Privacy – Speech Recognition Usage Description” field, add “Privacy – Microphone Usage Description” to info.plist file.

Initialize AVAudioEngine (process the audio and updates when the microphone is receiving voice), SFSpeechRecognizer (speech recognizer, better be optional because it could fail and be nil), SFSpeechAudioBufferRecognitionRequest (controls the buffering as the user speaks) and SFSpeechRecognitionTask (manage the speech recognition task) objects.
let avAudioEngine = AVAudioEngine()
    let speechRecognizer: SFSpeechRecognizer? = SFSpeechRecognizer() //the local parametar is automatically the device location
    //SFSpeechRecognizer(locale: Locale(identifier: "en-US")) -> another init option with specific local
    let request = SFSpeechAudioBufferRecognitionRequest()
    var recognitionTask: SFSpeechRecognitionTask?
The SFSpeechRecognizer language is automatically set by the user’s location, but can be manually set to locale with a certain identifier.
Set up the AudioEngine with .inputNode created a singleton and set the correct nodes needed to process the audio bit:
let node = audioEngine.inputNode
let outputFormat = node.outputFormat(forBus: 0)
node.installTap(onBus: 0, bufferSize: 1024, format: outputFormat) { buffer, _ in
 self.request.append(buffer)
//request is the name of the SFSpeechAudioBufferRecognitionRequest instance
}
Then prepare and start the recording of the AVAudioEngine by .prepare() and .start().
avAudioEngine.prepare()
do {
    try avAudioEngine.start()
    }
} catch {
    print(error)
}
Check if SFSpeechRecognizer instance isAvailable, then in recognitionsTask function pass the SFSpeechAudioBufferRecognitionRequest.
In the completion block get the best transcription result:
if speechRecognizer?.isAvailable ?? false{

    recognitionTask = speechRecognizer?.recognitionTask(with: request) { (result, _) in
        guard let result = result else {return}
        if result.isFinal{
            let transcription = result.bestTranscription
        }
    }
}
Use the transcription string as you wish. Usually the value is set to a label. You may stop and start the task by calling AVAudioEngine’s prepare/start/stop functions.
Very important to define the right audio session as shown below, otherwise the right audio session category won’t be recognized and cause a crash.
do {
    try AVAudioSession.sharedInstance().setCategory(AVAudioSession.Category.playAndRecord, options: .mixWithOthers)
    try AVAudioSession.sharedInstance().setActive(true)
} catch {
    print(error)
}
Example:
import UIKit
import Speech

class LiveAudioToSpeechViewController: UIViewController {

    let avAudioEngine = AVAudioEngine()
    let speechRecognizer: SFSpeechRecognizer? = SFSpeechRecognizer() //the local parametar is automatically the device location
    //SFSpeechRecognizer(locale: Locale(identifier: "en-US")) -> another init option with specific local
    let request = SFSpeechAudioBufferRecognitionRequest()
    var recognitionTask: SFSpeechRecognitionTask?

    override func viewDidLoad() {
        super.viewDidLoad()

        requestPermission()
        setAudioCategoryToPlayAndRecord()

        //AVAudioEngine creates a singleton and set the correct nodes needed to process the audio bit
        let node = avAudioEngine.inputNode
        let outputFormat = node.outputFormat(forBus: 0)
        node.installTap(onBus: 0, bufferSize: 1024, format: outputFormat) { [unowned self] (buffer, _) in
            self.request.append(buffer)
        }
    }

    private func requestPermission() {
        SFSpeechRecognizer.requestAuthorization { [unowned self] (status) in
            switch status {
            case .authorized:
                print("Speech recognition authorized")
                self.startRecording()
            case .denied:
                print("Speech recognition authorization denied")
            case .restricted:
                print("Not available on this device")
            case .notDetermined:
                print("Not determined")
            @unknown default:
                print("Unknown")
            }
        }
    }

    private func setAudioCategoryToPlayAndRecord() {
        do {
            try AVAudioSession.sharedInstance().setCategory(AVAudioSession.Category.playAndRecord, options: .mixWithOthers)
            try AVAudioSession.sharedInstance().setActive(true)
        } catch {
            print(error)
        }
    }

    private func startRecording() {
        avAudioEngine.prepare()
        do {
            try avAudioEngine.start()

            if speechRecognizer?.isAvailable ?? false{

                recognitionTask = speechRecognizer?.recognitionTask(with: request) { (result, _) in
                    guard let result = result else {return}
                    if result.isFinal{
                        let transcription = result.bestTranscription
                        print(transcription) //You can put this transcription into a label or any other use your app requires

                        for word in transcription.segments{
                            print(word) //Each word seperatly
                        }
                    }
                }
            }
        } catch {
            print(error)
        }
    }

    private func stopRecording() {
      avAudioEngine.stop()
      request.endAudio()
      recognitionTask?.cancel()
    }

}
VoiceOver
VoiceOver is a screen reader built into Apple’s operation system. By using VoiceOver, the user can access their devices based on spoken descriptions. In the case of the Mac, it’s by the keyboard. The feature is designed to increase accessibility for blind or low-vision users and users with dyslexia.
Used gestures:
- Single tap – any tap on the screen make the VoiceOver read the information from item’s accessibility attributes.
- Single swipe left/right – VoiceOver navigate between visible accessible items and reads any information from their accessibility description.
- Single swipe down – VoiceOver spelling out loud the focused item letter by letter.
- Double tap – selects the item with focus.
- Three finger swipe – swipe left or right to navigate backwards and forwards in a page view.
Needed properties:
- Label – Identifying the view.
- Traits – Describe the state, behaviour and usage of an element.
- Hint – Describe what action the element does.
- Frame – A CGRect where VoiceOver reads the content from.
- Value – The value of an element.
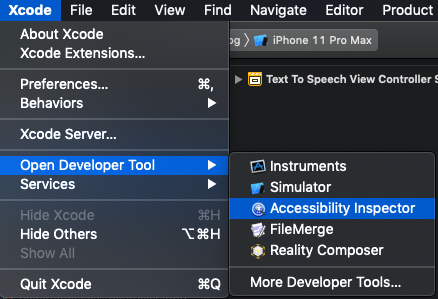
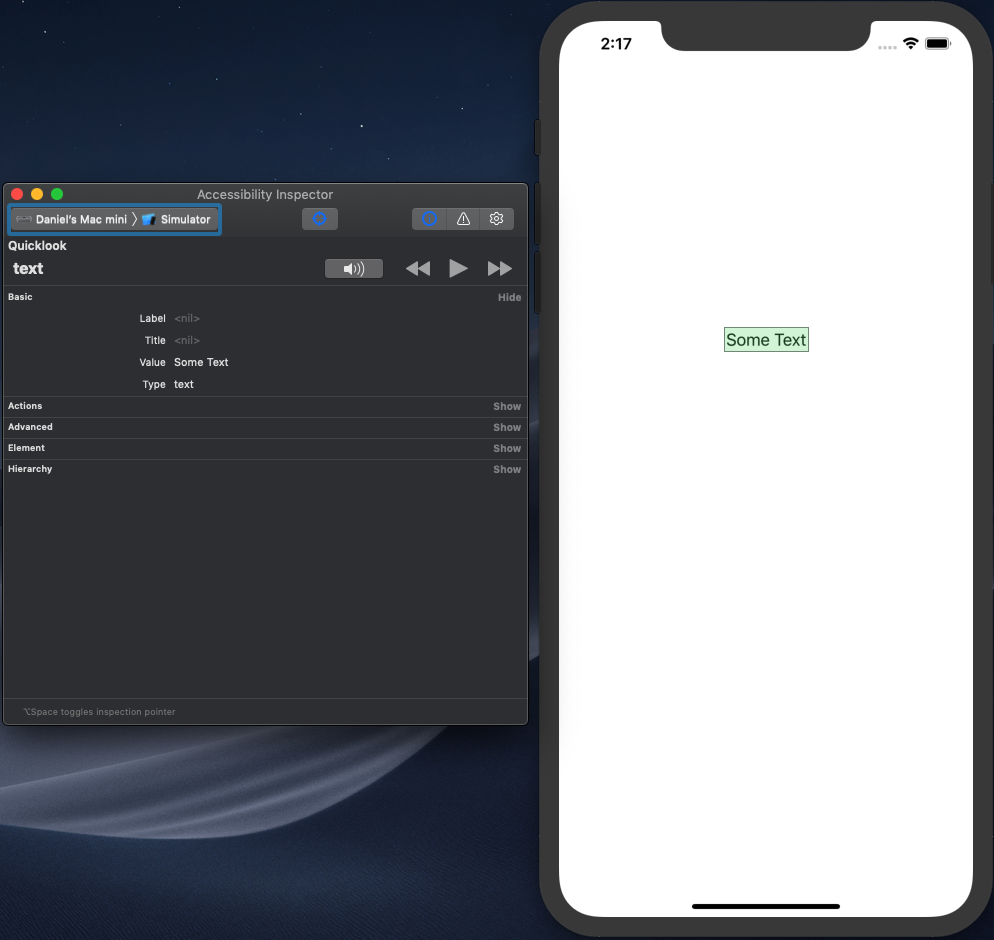
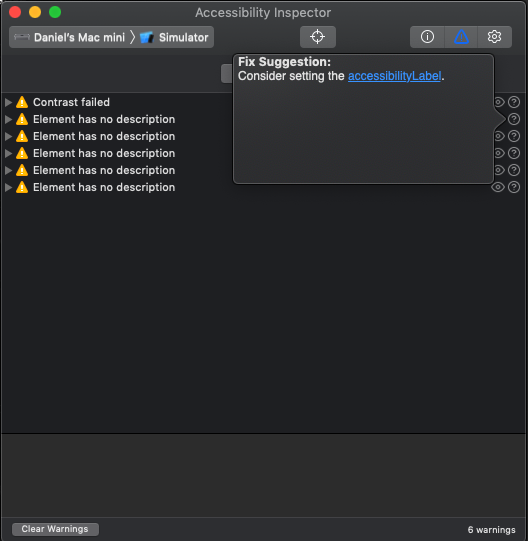
Since Xcode 8, apple provided an accessibility inspector. His purpose is to help you review your app’s accessibility and test each element by presenting all his accessibly information and notifying if some of them are missing. It also lets you test any gestures in the app.
By following this feature’s indications and adding the missing information you will make your app accessible.
Implementing accessibility in code:
Add this code to each view you desire to be accessible:
view.isAccessibilityElement = true
view.accessibilityTraits = //UIAccessibilityTrait + (element type, for example: “Image”)
view.accessibilityLabel  = “Element description”
view.accessibilityValue  = “Element value”
Making the text size adjust for the low vision users can only be made with dynamic fonts, which are fonts that able to be scaled automatically.
In addition for each UILabel define his font:
label.font = UIFont.preferredFont(forTextStyle: .body)
label.adjustsFontContentSizeCategory = true
Testing how your app handles font changes can be easily done with the accessibility inspector. Build and run your app and open the inspector. There you can easily change font sizes and see if the app still looks good. Take this opportunity to check the “Invert Colours” option.
As a final tip I recommend you to check all your app’s state including pressed bottoms or some chosen options and make sure to change the accessibility properties to mach it properly.
Captioning and Audio Descriptions
iOS 8 and later include the ability to play audio descriptions of video files when these tracks are available. The description is different from regular subtitles, it provides information about visual elements that may be essential to understanding the plot. During pauses in dialogue, a narrator will describe facial expressions, settings, actions, costumes, etc.
How to implement it in your videos:
In order to make a video accessible, you need to add it a description and characteristic tag to indicate that the track contains this services.
Quicktime Player, iTunes, Safari, and other apps that play video would be able to automatically select to present those description if it was defined by the used.
For movie files:
- Add “public.accessibility.describes-video” tag to the media characteristic to the descriptive video track.
- Add a language tag to the descriptive video track.
For HLS Audio Streams:
- Add “public.accessibility.describes-video” tag to the media characteristics to the audio rendition containing the descriptive video stream.
- Set the AutoSelect attribute to Yes for the descriptive video stream.
- Add a language tag to the descriptive video stream.
Guided Access
This feature mainly made to help people with autism to stay focused on a certain task on the used device. But it has many other reasons for developers to implement this option for the convenience of any other users.
Implementing it allows your app to control the sleep/wake button, the volume buttons, any device motions, hide the keyboard, ignore screen touches and limit time for using the app.
You can detect whenever Guided Access is enables by code with:
UIAccessibility.isGuidedAccessEnabledIf you would like to get notified when the GuidedAccess state got changed you can add an observer for name: UIAccessibility.guidedAccessStatusDidChangeNotification
NotificationCenter.default.addObserver(
            forName: UIAccessibility.guidedAccessStatusDidChangeNotification,
            object: nil,
            queue: .main
        ) { (notification) in
            //do some actions
            print("Guided access state is: ",UIAccessibility.isGuidedAccessEnabled)
        }
In order to define a custom Guided Access Restrictions you have to adopt UIGuidedAccessRestrictionDelegate protocol in the AppDelegate. The functions that have to be implemented are:
guidedAccessRestrictionIdentifierThe function must return an array with an identifier string for each custom guided access restriction you wish to provide in your app.
textForGuidedAccessRestriction(withIdentifier:)The function must return a localized, human-readable string that describes the restriction for the provided identifier.
detailsTextForGuidedAccessRestriction(withIdentifier:) //optionalThe function must return details for the string provided from the textForGuidedAccessRestriction functions.
guidedAccessRestriction(withIdentifier: didChange:)This functions notifies our app whenever access restrictions are turned on and off.
With using this function, change the wanted properties in your app to be compatible to what you wish for. For example, enable and disable a certain button.
Read article about Apple Watch or about static library in SWIFT